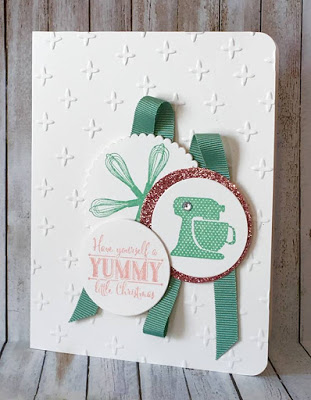
Hi friends. Is this card sweet or what???? I absolutely love it! It’s a great card to tuck in with some homemade Christmas gifts from kitchen – maybe add a recipe on the inside too!
Supplies:
•
Stamp Sets – Yummy
Little Christmas (142128 w, 142131 c)
Stamp Sets – Yummy
Little Christmas (142128 w, 142131 c)
•
Card Stock –
Shimmer White (101910)
Card Stock –
Shimmer White (101910)
•
Stamp Pads
– Mint Macaron (138326); Blushing Bride (131172)
Stamp Pads
– Mint Macaron (138326); Blushing Bride (131172)
•
Misc. – Blushing
Bride Glimmer Paper (140550); Layering Circles Framelits (141705); Sparkle
Embossing Folder (141468); 3/8” Ribbon Trio Pack (142021); Rhinestones
(119246); Project Life Corner (135346) Stampin’ Dimensionals (104430)
Misc. – Blushing
Bride Glimmer Paper (140550); Layering Circles Framelits (141705); Sparkle
Embossing Folder (141468); 3/8” Ribbon Trio Pack (142021); Rhinestones
(119246); Project Life Corner (135346) Stampin’ Dimensionals (104430)
Measurements:
•
Shimmer White: 5 1/2” x 8 1/2” (card
base), 2 3/4” x 8 1/2” (strip for stamped images)
Shimmer White: 5 1/2” x 8 1/2” (card
base), 2 3/4” x 8 1/2” (strip for stamped images)
•
Blushing Bride: 2 1/4” square
Blushing Bride: 2 1/4” square
•
Mint Macaron Ribbon: 18” length
Mint Macaron Ribbon: 18” length
Instructions:
1. Score
Shimmer White cardstock at 4 1/4”
Shimmer White cardstock at 4 1/4”
2. Run
card front through the Big Shot using the Sparkle Embossing Folder. Fold.
card front through the Big Shot using the Sparkle Embossing Folder. Fold.
3. Corner
Round right side corners as shown.
Round right side corners as shown.
4. Stamp
the mixer and whisks images in Mint Macaron on the 2 3/4” x 8 1/2” cardstock
strip. Cut out with Layering Circles. (1 5/8” plain edge for the mixer, 2 1/4” scallop
edge for the whisks)
the mixer and whisks images in Mint Macaron on the 2 3/4” x 8 1/2” cardstock
strip. Cut out with Layering Circles. (1 5/8” plain edge for the mixer, 2 1/4” scallop
edge for the whisks)
5. Stamp
greeting on the cardstock strip and cut out with the 1 5/8” plain edge circle.
greeting on the cardstock strip and cut out with the 1 5/8” plain edge circle.
6. Cut
out a 1 7/8 plain edge circle from the Blushing Bride Glimmer Paper.
out a 1 7/8 plain edge circle from the Blushing Bride Glimmer Paper.
7. Layer
and adhere cut circles as shown using Fast Fuse Adhesive. Attach greeting with
a Stampin’ Dimensional.
and adhere cut circles as shown using Fast Fuse Adhesive. Attach greeting with
a Stampin’ Dimensional.
8. Add
Fast Fuse Adhesive to the back of the layered circles. Attach ribbon as shown.
Fast Fuse Adhesive to the back of the layered circles. Attach ribbon as shown.
9. Adhere
all to the card front with Stampin’ Dimensionals.
all to the card front with Stampin’ Dimensionals.
Enjoy the day and HAPPY STAMPING!
Leave a Reply