
I know I already posted on my blog today, but it’s been just over a week since my last video and I wanted to squeeze one in for you! So you’re getting TWO posts in one day. Pretty radical. I know. However…this is a fun little technique that I think you may enjoy playing with this weekend. It’s such a simple technique, actually, that I half debated deleting my video and NOT posting it. Then I gave my head a shake! What was I thinkin’? Easy techniques are some of the best ones, right? There are many ways we can use our Designer Series Papers (and scraps) to create backgrounds for our cards and this is another variation. I’m calling it the “Pieced Grid” technique:
***Please Note: all of the Designer Series Papers and stamps that I used on these cards are RETIRING and are only available while supplies last. ****
Measurements:
- Card base: 8 1/2″ x 5 1/2″
- Basic Black card layer: 5 1/2″ x 4 1/4″, trim to 5 1/4″ and 4″ once all your pieces of Designer Series Paper are glued on
- Designer Series Paper: 5 1/2″ x 4 1/4″, trimmed into desired lengths

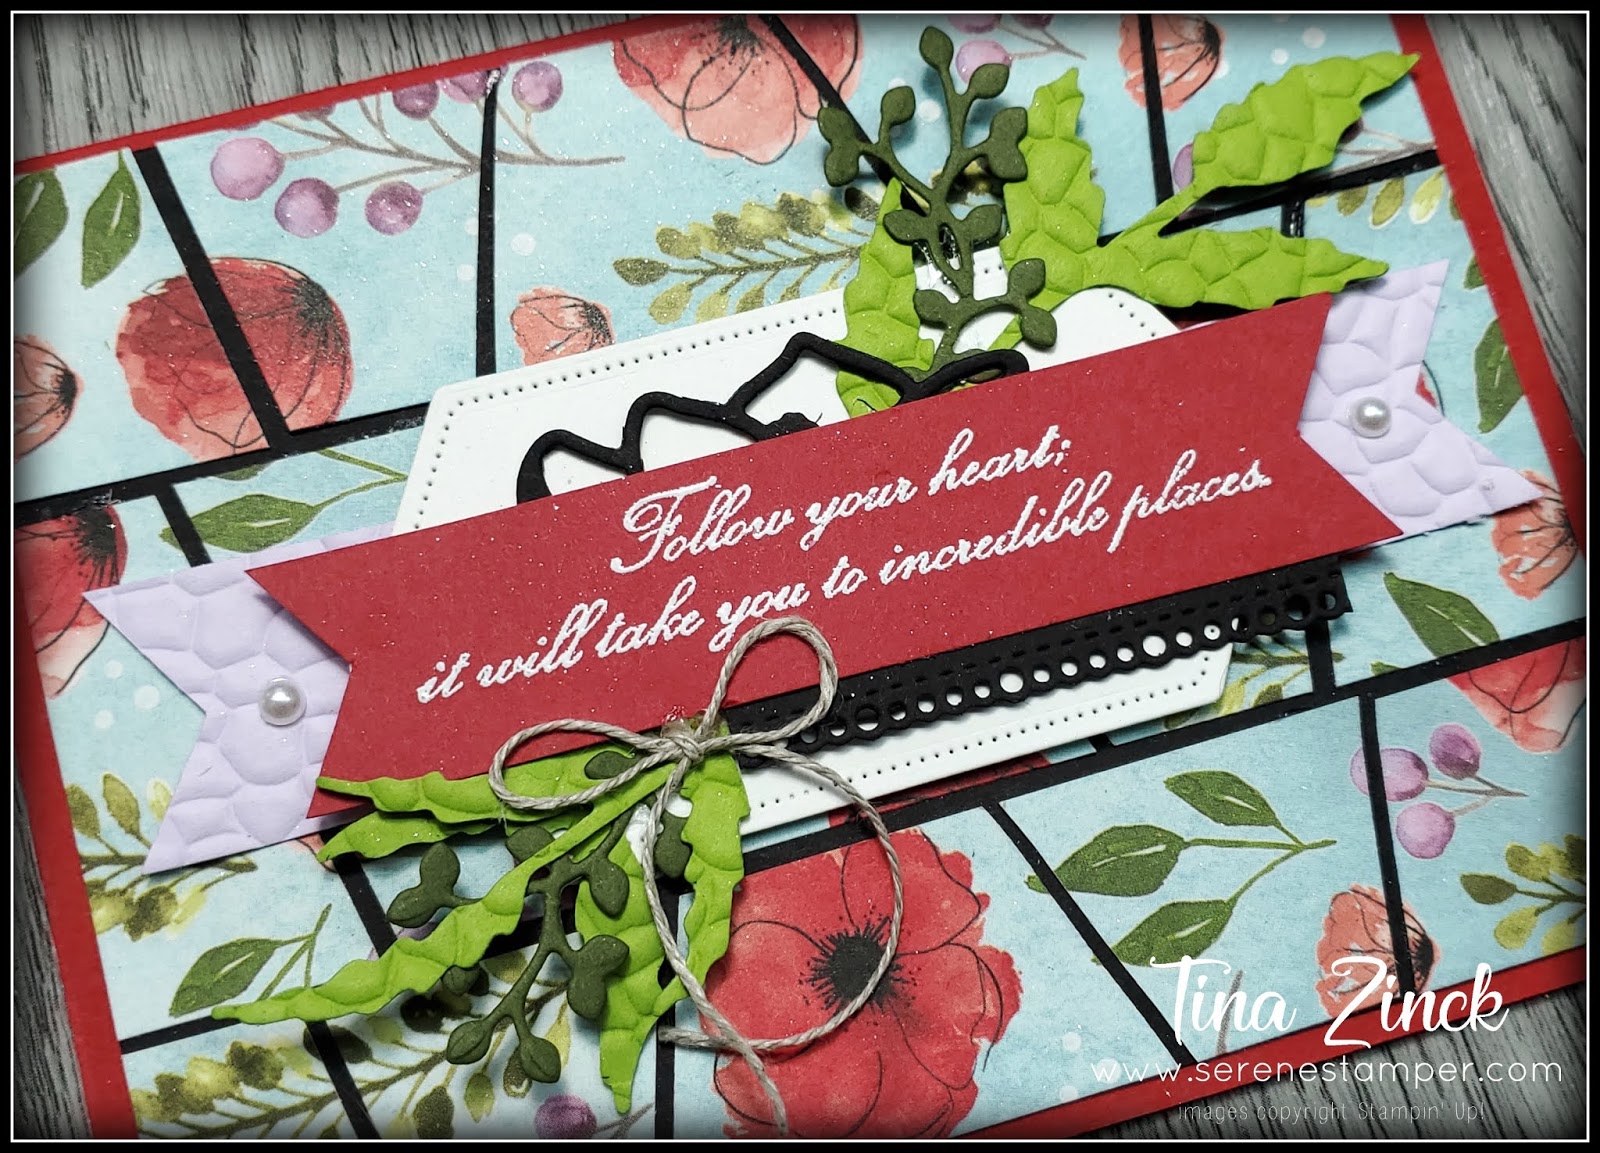
“PEACEFUL POPPIES” Card

The “Peaceful Poppies” Designer Series Paper is what I used for my pieced grid background. To decorate this card I used some fun die cuts and a bit of heat embossing. The sentiment is from the “Parisian Beauty” set, which is on our “Last Chance” retiring list.
Supply List:
Stamp : Parisian Beauty Cling Stamp Set (English) [151466]
Ink : Whisper White Craft Stampin’ Ink Refill [101780]
Card Stock : Peaceful Poppies Designer Series Paper [151324] , Poppy Parade 8-1/2″ X 11″ Cardstock [119793] , Basic Black 8-1/2″ X 11″ Cardstock [121045] , Highland Heather 8-1/2″ X 11″ Cardstock [146986] , Whisper White 8-1/2″ X 11″ Cardstock [100730] , Old Olive 8-1/2″ X 11″ Cardstock [100702] , Mossy Meadow 8-1/2″ X 11″ Cardstock [133676]
Tools & Adhesive : Heat Tool (Us And Canada) [129053] , Multipurpose Liquid Glue [110755] , Mini Glue Dots [103683]
Punch : Banner Triple Punch [138292]
Ribbon & Trim : Linen Thread [104199]
Accessory : White Stampin’ Emboss Powder [109132] , Stampin’ Dimensionals [104430] , Pearl Basic Jewels [144219]
Big Shot : Poppy Moments Dies [151594] , Stitched Nested Labels Dies [149638] , Hammered Metal 3D Embossing Folder [150646] , Ornate Borders Dies [152724]
“PARISIAN BLOSSOMS” Card

For this card, I simply created a banner to decorate. I also used a couple of die cuts from the new “Ornate Borders Dies” which I adhered along the top of the banner.

Supply List:
Stamp : Enjoy Life Photopolymer Stamp Set [148190]
Ink: Uninked Stampin’ Craft Pad & Whisper White Refill [147277]
Card Stock : Parisian Blossoms Specialty Designer Series Paper [151192] , Basic Black 8-1/2″ X 11″ Cardstock [121045]
Tools & Adhesive : Heat Tool (Us And Canada) [129053] , Embossing Buddy [103083]
Punch : Banner Triple Punch [138292]
Accessory : White Stampin’ Emboss Powder [109132] , Rhinestone Basic Jewels [144220]
Big Shot : Ornate Borders Dies [152724]
“TROPICAL OASIS” Card

I think this card is my favourite out of all four that I made – I just love all the colours! After I cut my flowers from the “Cherry Blossoms Dies” I sponged the edges with Petal Pink ink. For the middle, I dabbed the eraser end of a pencil into my Real Red ink pad and stamped that in the centre. I thought that was pretty clever of me. Just sayin’.

Supply List:
Stamp : Seriously The Best Cling Stamp Set [151712]
Ink : Whisper White Craft Stampin’ Ink Refill [101780] , Real Red Classic Stampin’ Pad [147084] , Petal Pink Classic Stampin’ Pad [147108]
Card Stock : Tropical Oasis Designer Series Paper [151252] , Basic Black 8-1/2″ X 11″ Cardstock [121045] , Daffodil Delight 8-1/2″ X 11″ Cardstock [119683] , Real Red 8-1/2″ X 11″ Cardstock [102482] , Whisper White 8-1/2″ X 11″ Cardstock [100730] , Mango Melody 8-1/2″ X 11″ Cardstock [146989]
Tools & Adhesive : Heat Tool (Us And Canada) [129053] , Mini Glue Dots [103683] , Multipurpose Liquid Glue [110755]
Ribbon & Trim : Whisper White 5/8″ (1.6 Cm) Polka Dot Tulle Ribbon [146912]
Accessory : White Stampin’ Emboss Powder [109132] , Stampin’ Dimensionals [104430] , Stamping Sponges [141337]
Big Shot : Layering Ovals Dies [151771] , Cherry Blossoms Dies [151456]
“BEST DRESSED” Card

I have a little pottery dish that I keep on my desk to collect bits and pieces like extra die cuts – so I already had all my flowers and butterflies cut for this card. I used my Stamparatus to stamp the “Thanks” sentiment, which I inked using Old Olive and Pretty Peacock markers. Then I cleaned my stamp and reinked, this time using Versamark on the “Thanks” so that I could emboss it in clear. The leaves from the “Seriously the Best” stamp set are stamped on scrap pieces of DSP (a woodgrain pattern) and I embossed them in gold and cut them out. I just love our new “Ornate Layers Dies” – so fancy and so easy to cut.

Supply List:
Stamp : Seriously The Best Cling Stamp Set [151712] , Many Marvelous Markers [147154] , Stamparatus [146276]
Ink : Versamark Pad [102283]
Card Stock : Best Dressed 6″ X 6″ (15.2 X 15.2 Cm) Designer Series Paper [151319] , Basic Black 8-1/2″ X 11″ Cardstock [121045] , Highland Heather 8-1/2″ X 11″ Cardstock [146986] , Daffodil Delight 8-1/2″ X 11″ Cardstock [119683] , Petal Pink 8-1/2″ X 11″ Cardstock [146985] , Lovely Lipstick 8-1/2″ X 11″ Cardstock [146970] , Pretty Peacock 8-1/2″ X 11″ Cardstock [150880]
Tools & Adhesive : Heat Tool (Us And Canada) [129053] , Multipurpose Liquid Glue [110755] , Mini Glue Dots [103683]
Accessory : Gold Stampin’ Emboss Powder [109129] , Pearl Basic Jewels [144219] , Rhinestone Basic Jewels [144220] , Stampin’ Dimensionals [104430] , Clear Stampin’ Emboss Powder [109130]
Big Shot : Garden Gateway Dies [151512] , Ornate Layers Dies [152726]


- All online orders will receive a hand stamped card in the mail (as long as I have your address!) and 12 step-by-step stamping tutorials will be emailed to you as token of my appreciation for your online order!
- At the end of each month everyone who ordered with me has their name put in a draw for a gift of Stampin’ Up! product (winner is chosen via random.org).
Simply enter this month’s special host code
prior to submitting your order through my website.

If your order is $200 or more DO NOT enter the Host Code
so that you will also receive your stamping rewards
(I will still send you the PDF tutorials).

I hope that you enjoyed today’s video demonstration and cards! I also hope that you’ve enjoyed my “Top Ten Favourite Retiring Products” list that I’ve shared over the last ten days with you! It wasn’t easy picking only 10 items, as there are LOTS of fabulous products retiring.
Our new annual catalogue goes live on June 3rd and it is INCREDIBLE!!!
If you have placed an order with me in the past year, I’ve already got a catalogue reserved for you and it will be mailed out next week. If you haven’t ordered with me but you’d like to receive a catalogue (Canada only) please email me at serenestamper@gmail.com.
Have a fabulous weekend & HAPPY STAMPING!

- Visit my online store here
- Save big on the Clearance Rack
- Current specials
- Shop with me and receive a gift!
- My Serene Stamper YouTube channel
- Join me on Facebook
- Come stamp with me!
- Start your own business.
- Paper Pumpkin Monthly Craft Kits
- Sign up for my newsletters
A wonderful tutorial Tina. Your finished cards are gorgeous. Beautiful DP too
These are so pretty – a great idea to use up the pieces of DSP – thanks for the inspiration