• Skip to secondary menu
  • Skip to main content
  • Skip to primary sidebar
  • Clearance Rack
  • Product Suites
  • Bundled Savings
  • Kits & Subscriptions

Tina Zinck, Stampin' Up! Demonstrator

Teaching others the art of stamping and paper crafting. Let me show you how to use the exceptional products from Stampin' Up! and all the different ways you can create with them!

  • Home
  • Events
  • Gallery
  • Videos
  • Shop Tutorials
    • My account
    • Checkout
  • Shop Stampin’ Up!
    • Shop My Online Store!
    • Latest Catalogue(s)
    • Current Specials
    • 🌟My Customer Appreciation Gift 🌟
  • Join the fun
    • Sign Up Online!
  • Recipes
  • About Me
    • Contact
  •  

“Peaceful Cabin” Side Step Card Tutorial

December 21, 2021 Leave a Comment

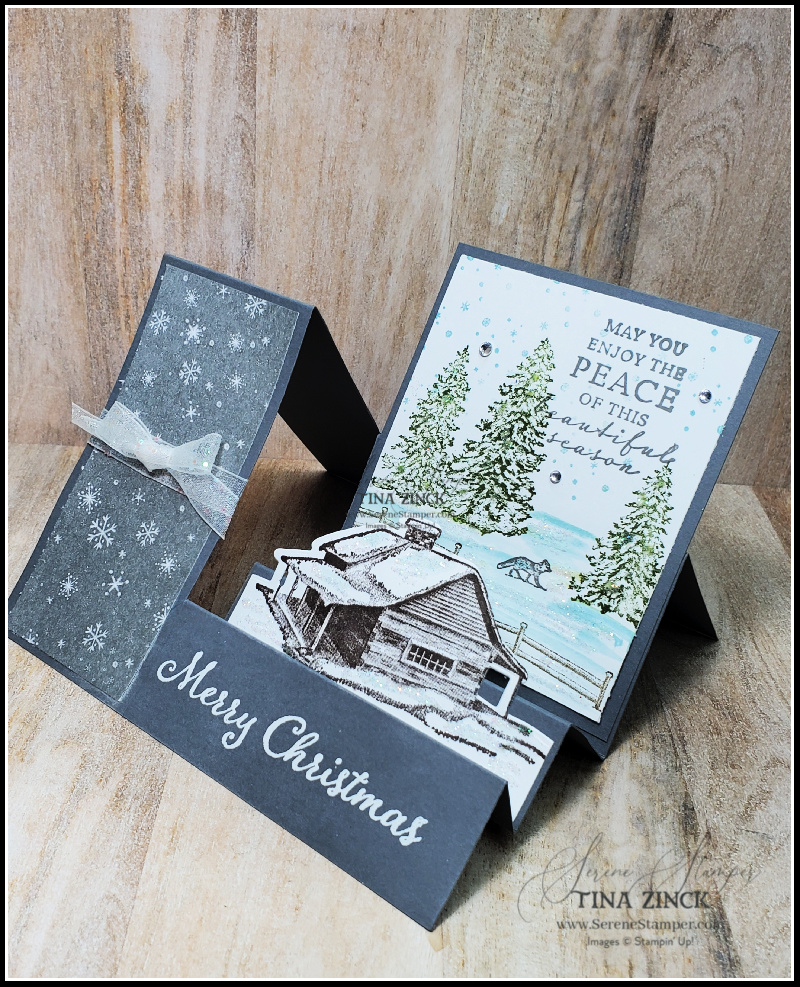
Hi Friends! I just can’t believe that we’re only three days away until Christmas Eve! Today I’m sharing one last Christmas card with you, as you may still need some inspiration to finish making a few more cards for this holiday season. This is a ‘side-step fun fold card’ and it’s really quite simple to make. I used the “Peaceful Cabin” bundle on my card, but of course, you could use any stamp set, dies and designer series papers that you wish.

Measurements:

  • Basic Grey: 5 1/2” x 8 1/2”,
  • Soft Suede: 11” x 2”, scored at 5 1/2”, plus piece for circle die cut
  • Designer Series Paper: 1 3/4” x 5 1/4” (2 pieces), plus piece for circle die cut
  • Basic White: 1 3/4” x 5 1/4”, plus piece for circle die cut

Instructions:

  1. Along the 5 1/2” side, score at 2”.
  2. Along the 8 1/2” side, score at 2 1/4” down to the 2” score line, 4 ¼” all the way down, and 5 1/2”, 6 1/2” and 7 1/4” to the 2” score line.
  3. Cut along the 2” crease between the top and bottom side score lines to create a slit.
  4. Fold card along the 4 1/4” score line.
  5. Fold the side score lines into ‘step’ starting with a mountain fold, then valley, then mountain and valley.
  6. Cut a piece of card stock in the same colour to measure 3 1/2″ x 4″ and a piece of basic white 3 1/4″ x 3 3/4″. Stamp onto the white and glue to the two pieces together. Glue along the crease of the back ‘step’.
  7. Cut a piece of Basic white 3 1/2” x 2” and stamp cabin, cut out with die and glue to crease of second step.
  8. Cut a piece of DSP 4” x 1 3/4” and glue to left side of card. Wrap with ribbon.
  9. Stamp sentiment with versamark and emboss sentiment in white.

Items on the LAST CHANCE list have been going FAST! Be sure to order your favourite retiring products right away, before they’re gone for forever! Click HERE to see what’s still available and/or to place your order.

As Christmas is nearing upon us, I’m going to be taking some time off to enjoy the holiday season, until the second week of January. However, I will be checking my email and I’ll get back to you as soon as I can, should you have any questions about our products or if you need assistance placing your order. I’ve also got fun tutorials scheduled for you here on my blog over the next couple of weeks that feature NEW PRODUCTS coming out on January 4th! If you have placed an order with me over the past 12 months then I have already mailed the new 2022 Mini Catalogue & Sale-a-bration brochure to you – please let me know if you haven’t received your copies. If you haven’t placed an order with me but would also like to receive our new catalogues, just pop me an email at serenestamper@gmail.com

Have a WONDERFUL & safe Christmas, my dear friends, and all the very best for the coming year!

Love,

Pin461
Share
Tweet
Share
461 Shares

Filed Under: Tutorial Tagged With: Free Tutorials, fun fold, peaceful cabin, side step card

I joined Stampin' Up! the first night they arrived in Canada, April 2002, and what a ride it's been! At the time I just wanted the discount on all of the fabulous stamps and accessories - why pay full price if you don't have to, right? But little did I know where my journey with Stampin' Up! would take me. Read More…

Reader Interactions

Leave a Reply Cancel reply

Your email address will not be published. Required fields are marked *

Primary Sidebar

WELCOME!

Nova Scotia, CANADA

Tina Zinck

Stampin' Up!© Independent Demonstrator

Contact Me!

Creative Watercolour Pencils Workshop

Lifetime access. Easy to follow. Instant download.

Check out my Creative Watercolour Pencil Workshop!
This class has already helped so many stampers fall in love with their pencils again — and the results are absolutely stunning!

Click to subscribe to my newsletter
Shop

SEE MORE PRODUCTS ONLINE!

View our Annual Catalogue Online!

Stampin' Up! Annual Catalogue

View our Mini Catalogue

Stampin' Up! Mini Catalogue

2025 Scrapbooking Brochure

Stampin' Up! Scrapbook Brochure

  • Email
  • Facebook
  • Instagram
  • Pinterest
  • YouTube

Archives

Categories

My Stampin’ Up! Achievement Awards

#3 in Canada
#6 in Canada
#12 in Canada
Disney’s Grand Floridian Resort & Spa 2025
Hotel Xcaret México 2024
#2 Leadership (CANADA)
#10 Top Demonstrator (CANADA)
2023 Incentive Trip
2023 Team Building
2023 Annual Sales
2023 Leadership
2022 Incentive Trip
2022 Annual Sales
2022 Team Building
2021 Platinum
2021 Team Building
2021 Top Performer
2021 Incentive Trip
2021 Team Building
2021 Leadership
2021 Annual Sales

2020 Stampin’ Up! Achievement Awards

Stampin' Up! 2020 Awards

Stampin’ Up! Founder’s Circle Achiever

Stampin' Up! Founder's Circle 2013
Stampin' Up! Founder's Circle 2014

Struggling in Direct Sales?

See How I Built a Business That Works!

After years in direct sales, I found myself working harder for less. Sound familiar? I knew there had to be a better way. Now, I’ve built a profitable online business that runs on my terms—without inventory, parties, or chasing sales.

💡 Curious how it works? Click the image now to learn more!

Try Constant Contact 30 Days Free

Try Constant Contact 30 Days Free
Disclaimer

This is my personal blog and I am responsible for its content. Stampin' Up! does not endorse the use of or contents of the classes, services, or products offered here. All of my own ideas & creations are © Tina Zinck. Should any item be "cased" then proper credit will be given to the creator of that item.

Site designed & maintained by WebsByAmy, LLC