
It’s the weekend! YAY! I’ve got my “Sale-a-bration Celebration” party happening today. This exclusive event if for all my customers who ordered from me during SAB. We’ll be creating fun projects, playing stamping bingo for prizes, and enjoying a yummy lunch together. I love spoiling my customers! Those who earned an invitation to this event who live too far away to attend will receive the projects and gifts in the mail (FYI – all invites were sent out in the mail, so if you received one, you know a package will be sent to you). I’ll share photos of the party with you next week!

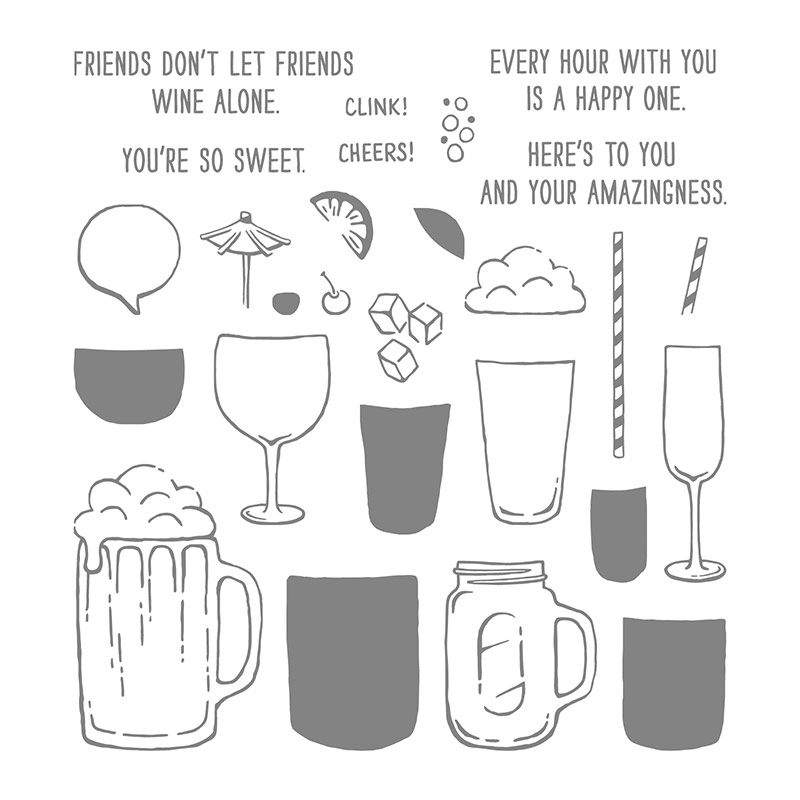

Today’s card tutorial uses the “Mixed Drinks” stamp set – which is retiring. This card was created by my friend and fellow Stampin’ Up! demonstrator, Lisa Curcio. Enjoy!
Supplies:
-
Stamp
Sets
–
Mixed
Drinks (141928) -
Card
Stock –
Whisper White (100730); Crumb Cake (120953); Real Red (102482);
Crushed Curry (131199) -
Stamp
Pads
– Crumb Cake (126975); Real Red (126949); Tuxedo Black Memento
(142708); Whisper White Craft (101731) -
Misc.
– Big Shot (143263); Stitched Shapes Framelits (145372); Regals
Enamel Dots (141681); Clear Wink of Stella (141897); Blender Pens
(102845); Dimensionals (104430); Fine-Tip Glue (138309); Silicone
Craft Sheet (127853)
Measurements:
-
Whisper
White (base): 5 ½” x 8 ½”, folded in half -
Whisper
White: scrap to die cut square -
Crumb
Cake (layer): 4” x 5 ¼” -
Crushed
Curry: 2” x 6” -
Real
Red: (banner)” ½” x 2 ½” -
Real
Red (strip): 1/8” x 5”
Instructions:
- Stamp
the foam/whipped cream image randomly on the Crushed Curry layer
using Whisper White craft ink. Let dry. - Adhere
the Real Red strip to the Crushed Curry layer, leaving ½” border
at the top as shown. Use the Silicone Craft Sheet when placing the
adhesive on this strip so that the excess adhesive will not stick to
your work surface. Adhere to the Crumb Cake layer on an angle as
shown. Turn the cardstock over and trim the excesslayers
from the backside, following the edge as a guide. Adhere these
layers to the Whisper White card base. - Die
cut a Stitched Square from the framelits. Stamp the tall glass
image using Memento ink, near the center bottom of the square. Be
sure to leave room at the top for the whipped cream and straw. Stamp
the whipped cream image on top of the glass using Memento ink.
Stamp the outline cherry image on the whipped cream using Memento
ink. Fill the inside of the cherry with the solid image using Real
Red ink. Use the shortest straw image and stamp on the whipped
cream using Crushed Curry ink. Be sure the ‘finished edge’ of
the straw is at the top. - To
fill the glass, ink the coordinating solid image using Crumb Cake
ink. Stamp off one layer of ink on scratch paper to reduce the
shade. Stamp inside the glass. Adhere the image square to the card
base using Dimensionals. - Create
a banner tip on the right side of the Real Red cardstock. Stamp the
greeting close to the banner tip using Memento ink. Adhere the
banner to the card as shown using Dimensionals. Place a Crushed
Curry Enamel Shape Heart to the left side of the greeting. - Fill
in the whipped cream using Clear Wink of Stella. - Fill
in the glass using Fine-Tip Glue. Let dry completely. The glue will
dry clear and provide a realistic look to the glass.
The Retiring Lists have been released:
***Some retiring items have already SOLD OUT!***

CUSTOMER APPRECIATION PROJECT TUTORIALS
- Every customer who places an order through my online store will receive 12 beautiful project sheets by email.
- When your order is a min. $60CDN
you’ll also receive the exclusive BONUS “Passport Pals” tutorial!

Every
month my friend Frenchie (France Martin) and I create a special
BONUS tutorial with six projects exclusively for our customers! Our
“Passport Pals” tutorials includes
measurements, colour photos, step-by-step instructions (sometimes
videos) and of course, the supplies list! This is our way of thanking
YOU, our valued customer, for shopping with us!
Simply enter this month’s special host code
prior to submitting
your order through my website.
your order through my website.

If your order is $200 or more DO NOT
enter the Host Code
so that you will also receive your stamping rewards
(I will still send you the PDF tutorials).
enter the Host Code
so that you will also receive your stamping rewards
(I will still send you the PDF tutorials).
If you live in the USA,
click here to visit Frenchie on her to blog and
here to shop through her online store.
This month’s Passport Pals tutorials features:
Label Me Pretty (Embossing Folder Technique)
Butterfly Basics Flower Shop Card
Bird Banter Paper Piecing Card
Beautiful You in the Rain Card
Move Me Butterfly in the Window Card
Whole Lot of Lovely Card
Video: Mirror Image Reflection Technique
Enjoy the day and HAPPY STAMPING!

Leave a Reply