
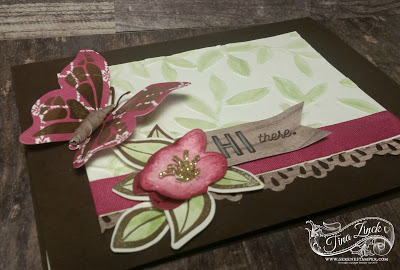
Hi Friends! I wanted to play with my new “You Move Me” bundle and make a quick “Hi there” card

This bundle is pretty darn awesome because it creates ‘animation’ which you can see here:
As I was short on time, I just made a quick card with the “You Move Me” bundle, but I’ll be making some animated cards to share with you really soon! I also used the new Decorative Ribbon Border Punch, which I just love. I’ve really missed having our decorative border punches, so I’m really happy Stampin’ Up! included this new punch in the 2017-2018 Catalogue!
Also, the inspiration for this card is from a layout sketch that I sent out with my last newsletter. If you’re not already one of my subscribers, please take a moment to click on the button below – you’ll receive monthly news, project ideas, special offers and more.
Here’s the layout & measurements I used on today’s card:

I had so much fun making this card – there were a few steps to making it, but it really came together surprisingly quickly.
“HI THERE” You Move Me Card
- Fold 8 1/2″ x 5 1/2″ piece of Early Espresso card stock in half to create card base. Use Bone Folder to get a good crisp crease along the fold.
- Lightly mist 4 1/4″ x 3″ Whisper White layer with water and place inside “Layered Leaves” 3D Dynamic Textured Impressions Embossing Folder. Run through Big Shot. Set aside to dry.
- Once cardstock is dry, add a light wash of colour to the leaves using Pear Pizzazz ink pad and aqua painter.
- Cut a piece of Wood Textures DSP to measure 1 1/4″ x 4 1/4″ and create edge using Decorative Border punch. Glue behind Whisper White layer.
- Wrap Berry Bliss ribbon to cover seam between whisper white card stock and the wood texture DSP border. Secure with glue and the add to card base with Stampin’ Dimensionals.
- On scrap piece of Whisper White, stamp four sets of leaves from “You Move Me”, using Versamark ink. Sprinkle with Gold Embossing power, shake off excess and set with heat tool. Squeeze Pear Pizzazz ink pad to get a puddle of ink on the inside of lid – open and use with Aqua Painter to add a wash of colour inside the gold embossed leaves. Place coordinating leaf thinlet dies over leaves and run through Big Shot with the Magnetic Platform. Use glue dots and dimensionals to add to card, as shown (cutting some of the leaves to use individually).
- Stamp “Hi there” images from “You Move Me” stamp set using Early
Espresso ink onto strip of Wood Textures DSP. Colour inside the “hi”
letters using the white watercolour pencil crayon. Use paper snips to
create ‘banner’ and glue over the leaves. - Ink large flower stamp from “You Move Me” with Berry Burst ink pad and stamp twice onto scrap piece of Whisper White, without re-inking the second time. Cut with coordinating thinlet. Use a sponge to add more Berry Burst ink along the edge of lighter flower. Glue darker flower directly onto the leaves/banner and use a stampin’ dimensionals to add second flower on top.
- Cut staymen with coordinating thinlet using scrap piece of gold glimmer card stock – use glue dot to add to centre of flower.
- Stamp bold image butterfly from “You Move Me” with versamark ink onto a piece of Berry Burst Fresh Floral DSP. Cover with Fold Embossing Powder, shake of excess and set with heat tool. Cut butterfly using coordinating thinlet. Use bone folder along each wing to curl slightly. Colour antenna with Early Espresso ink and gently lift up using bone folder (or paper snips). Adhere to card.
- To create butterfly body: cut a piece of wood textures DSP into a narrow triangle strip. Place a glue dot on paper piecing tool to hold wide end of DSP strip and start rolling tightly. Use another glue dot to secure end and gently pull off the tool. Use Liquid Glue to adhere to butterfuly, holding for a moment, until glue sets a but.
- Cut computer paper (or whisper white card stock) to measure 4″ x 5 1/4″ and glue inside the card for message.
Supplies:


Links by TheseAreMyStamps.com

As always, I
appreciate all of you who shop through my online store!
appreciate all of you who shop through my online store!
All orders placed through my online store will
receive a FREE tutorial. This PDF tutorial features 12 beautiful card
projects, with all measurements, step-by-step instructions and supplies
list.
receive a FREE tutorial. This PDF tutorial features 12 beautiful card
projects, with all measurements, step-by-step instructions and supplies
list.

Simply enter this month’s special host code prior to submitting
your order through my website. If your order is $200 or more DO NOT enter the
host code so that you will also receive your stamping rewards and I will then
send you the PDF tutorial. All qualified orders will receive the download
by e-mail.
your order through my website. If your order is $200 or more DO NOT enter the
host code so that you will also receive your stamping rewards and I will then
send you the PDF tutorial. All qualified orders will receive the download
by e-mail.

Find out how YOU can have a chance at getting your
hands on a complete set of “Many Marvelous
Markers” just by shopping for your Stampin’ Up! products through my
online store:
hands on a complete set of “Many Marvelous
Markers” just by shopping for your Stampin’ Up! products through my
online store:
Shop 24/7 for your favourite Stampin’ Up! products at
my online store
my online store
Discounts galore on my Clearance Rack
& Promotions
& Promotions
My youtube tutorials
View the current catalogues
online
online
Calendar of Events – come stamp
with me!
with me!
Questions? Email
me at serenestamper@gmail.com
me at serenestamper@gmail.com
HAPPY STAMPING!
Beautiful creation! Thanks so much for sharing all the details. Love, love, love it!
Thanks Jackie!