
Happy Valentine’s Day! I’ve got a beautiful tutorial to share with you today, perfect for last minute gifts and cards for the special Valentines in your life! The Note Cards and Gift Box was created by Michelle Hornback for our Leaders Project Sheet Group.

-
Stamp
Sets
–
Sure
Do Love You (145763-w, 145766-c); Bundle (145965-w, 145966-c) -
Card
Stock –
Powder Pink (144244); Rich Razzleberry (115316); Whisper White
(100730); Melon Mambo -
Stamp
Pads
– Rich Razzleberry (126950); Melon Mambo (126948); Powder Pink
(144084); Calypso Coral (126983) -
Misc.
– Painted With Love Specialty Designer Series Paper (DSP)
(145580); Gold Foil Sheets (132622); Whisper White Narrow Note Cards
& Envelopes (145583); Painted Love Gold Vinyl Stickers (145586);
Big Shot (143263); Lots to Love Box Framelits (145653); Classic
Label Punch (141491); 2¼” Circle Punch (143720); Pearl Basic
Jewels (144219); Gold Metallic Thread (138401); Sponge Daubers
(133773); Tear and Tape (138995) or Fast Fuse (129026); Stampin’
Dimensionals (104430)
Box
Measurements:
Measurements:
-
Powder
Pink Card Stock: 1½” x 3¾” min scrap -
Rich
Razzleberry Card Stock: 4¼” x 6½” min scrap (2) -
Melon
Mambo Card Stock: 2¾” x 4¼” min scrap -
Painted
With Love DSP – stripe: 1½” x 12” -
Gold
Foil: 2½” x 2½” min scrap
Instructions:
-
Using the Lots to Love Box Framelits, cut
two (2) box pieces from Rich Razzleberry. -
Fold
all score lines. -
Add
Tear and Tape or Fast Fuse to the long tabs. -
Assemble
box. Make sure the rounded ends are opposite each other. -
Wrap
DSP around box and adhere to itself.-
This
is a belly band you want to be able to remove. -
Make
sure the end pieces meet in the front as they will be covered.
-
-
Punch
a circle from the gold foil.-
Add
adhesive to the back and add gold thread to the back with loops
appearing from behind. -
Add
dimensionals and adhere to the belly band.
-
-
Stamp
the valentine sentiment heart with Melon Mambo ink on Melon Mambo.-
Cut
out using the framelit. -
Cut
a small heart from the right up side of the heart using the
elongated small heart. -
Adhere
to circle.
-
-
Cut
two (2) more small hearts from Melon Mambo using the same framelit. -
Stamp
“sure do love you” in Rich Razzleberry ink on Powder Pink.-
Cut
out with matching framelit. -
Adhere
to large heart with dimensionals.
-
-
Adhere
small hearts with dimensionals. -
Add
small pearls to the hearts.

Just
for You Card Measurements:
for You Card Measurements:
-
Powder
Pink Card Stock: ½” x 2½” min scrap -
Painted
With Love DSP – stripe: 2¾” x 4½” min scrap
Instructions:
-
Stamp
heart outline with Rich Razzleberry ink on notecard. -
Stamp
leaves with Rich Razzleberry ink on notecard. -
Stamp
“just for you” with Rich Razzleberry ink on Powder Pink.-
Punch
with Classic Label Punch.
-
-
Cut
large heart from DSP. -
Add
adhesive to center of the stamped heart.-
Loop
Gold Thread over the adhesive.
-
-
Adhere
heart to card using dimensionals. -
Adhere
sentiment over heart. -
Add
pearls. -
Punch
2¼” circle from DSP and adhere to inside of envelope.

Valentine
– Portrait Card Measurements:
– Portrait Card Measurements:
-
Powder
Pink Card Stock: 2¾” x 2” min scrap -
Painted
With Love DSP – hearts: 2” x 4”; 2½” x 2½” min scrap -
Rich
Razzleberry: 2¼” x 4¼”; 2½” x 2½” min scrap
Instructions:
-
Layer
& adhere Rich Razzleberry and DSP onto notecard. -
Punch
circle from Rich Razzleberry and adhere to card. -
Add
adhesive to center of circle.-
Loop
Gold Thread over the adhesive.
-
-
Stamp
“valentine” heart with Rich Razzleberry ink on Powder Pink.-
Cut
with framelit. -
Adhere
to card with dimensionals.
-
-
Punch
2¼” circle from DSP and adhere to inside of envelope.

Love
Card Measurements:
Card Measurements:
-
Powder
Pink Card Stock: 1” x 3” min scrap -
Painted
With Love DSP – dots: 1” x 4½”; 2½” x 2½” min scrap -
Rich
Razzleberry: 1¼” x 4½”
Instructions:
-
Adhere
Rich Razzleberry and DSP to notecard. -
Stamp
small hearts with Rich Razzleberry on Powder Pink.-
Cut
with framelits. -
Adhere
to card with dimensionals.
-
-
Add
Gold Vinyl leaf, hearts, and “love” stickers to the card. -
Punch
2¼” circle from DSP and adhere to inside of envelope.

Valentine
– Landscape Card Measurements:
– Landscape Card Measurements:
-
Whisper
White Card Stock: 2¾” x 2” min scrap -
Painted
With Love DSP – dots: 1” x 4½”; 2½” x 2½” min scrap
Instructions:
-
Adhere
DSP (dots side down) onto notecard. -
Ink
“valentine” heart with Powder Pink ink.-
Using
the sponge dauber, add Calypso Coral ink in random places. -
Stamp
on Whisper White. -
Cut
with framelits.
-
-
Add
adhesive to center of heart.-
Loop
Gold Thread over the adhesive. -
Adhere
to card with dimensionals.
-
-
Add
Gold Vinyl leaf and heart stickers. -
Punch
2¼” circle from DSP and adhere to inside of envelope.

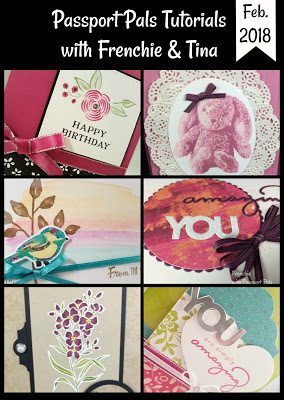
“Customer Appreciation Tutorials”
Every
month my friend Frenchie (France Martin) and I create a special
tutorial with six projects exclusively for our customers! Our
“Passport Pals” tutorials includes
measurements, colour photos, step-by-step instructions (sometimes
videos) and of course, the supplies list! This is our way of thanking
YOU, our valued customer, for shopping with us!
- Every customer who places an order through my online store will receive 12 beautiful project sheets by email.
- When your order is a min. $60CDN
you’ll also receive the exclusive BONUS “Passport Pals” tutorial!
Simply enter this month’s special host code prior to submitting
your order through my website. If your order is $200 or more DO NOT
enter the Host Code so that you will also receive your stamping rewards (I will still send you the PDF tutorials).
your order through my website. If your order is $200 or more DO NOT
enter the Host Code so that you will also receive your stamping rewards (I will still send you the PDF tutorials).
If you live in Canada,
use February’s special host code before your submit your order:
use February’s special host code before your submit your order:

If you want to save even more during Sale-a-bration, click here to check out my “Gotta Have it All!” Starter Kit, along with all the extra perks and benefits that go along with it!
If you have a big wish list of Stampin’ Up! items that you want to get, I encourage you to get the Starter Kit. There
are no strings attached and no risk – just a whole LOT of products at
approx. $250 savings in your pocket from now until March 31st!
are no strings attached and no risk – just a whole LOT of products at
approx. $250 savings in your pocket from now until March 31st!
Enjoy the day and HAPPY STAMPING!

Leave a Reply