Friends, I have to share this sweet little card with you – it was designed by the fabulous Loni Spendlove from our Leaders Project Sheet group, and oh my goodness… it’s just the cutest!
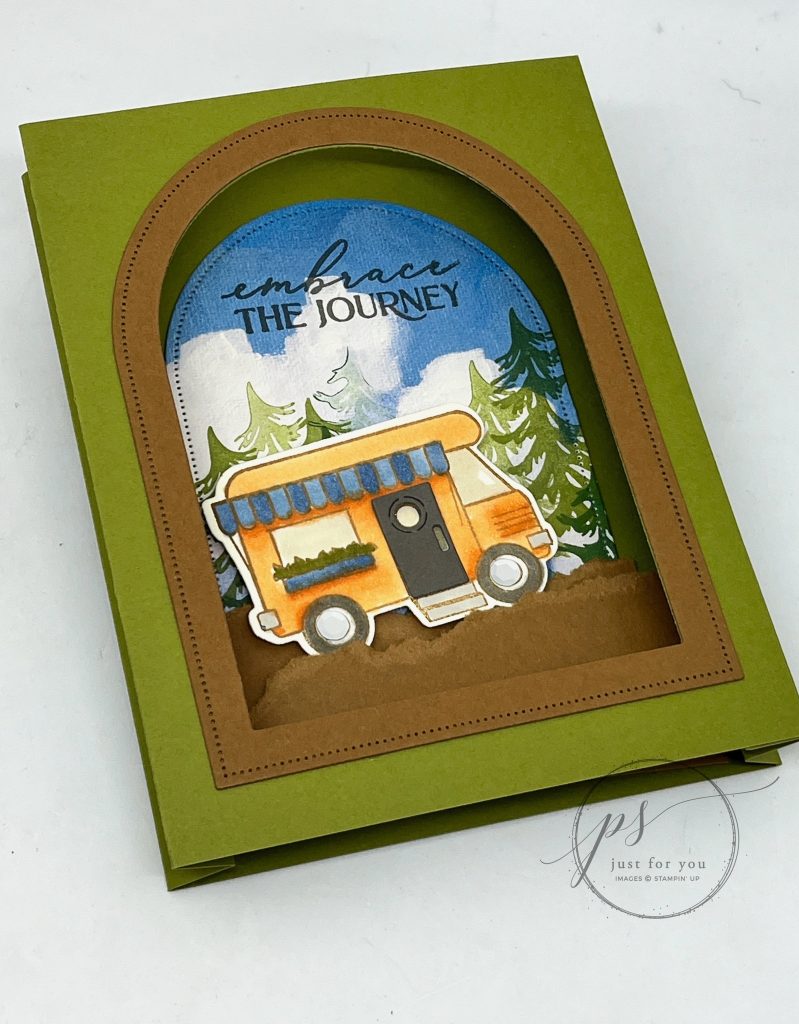
The camper-themed stamp and die bundle Loni used totally made me smile, and I loved the card so much I placed an order for the bundle right away! The “Everyday Arches” bundle is fabulous too and I’ve been using it for so many cards (which I’ll be sharing with you soon). Unfortunately, this bundle is on backorder until May 19th, and the sky DSP is out of stock at the moment. Here are the steps to create this ADORABLE card:
“Embrace the Journey” Window Card Tutorial
Measurements:
- Old Olive Card Stock: 11” x 5 1/2”, scored at 4 ¼”, 4 ¾”, 5 ¼”, 9 ½”, 10” and 10 ½”
- Pecan Pie Card Stock: 5 ½” x 4 ¼”, plus scraps for mountains
- Very Vanilla Card Stock: 2” x 2 ½” for stamping and 4” x 5 ¼” for back panel to write on.
- DSP: 3” x 4 ¼”
Instructions:
- On the full panel end of the Old Olive card stock (5 ½” x 4 ¼” section), die cut the 4th largest arch die (4 ¼” x 3”) from the center to create a window. Use the same die to cut the shape from the Designer Series Paper.
- Using the same die AND the 2nd largest arch (3 ⅝” x 4 ⅞”), cut an arch “frame” from Pecan Pie card stock and adhere it to the front of the card with liquid glue. Tip: Use the Pecan Pie card stock from the small arch leftover from the frame for the torn mountains!
- Stamp trees using Old Olive ink onto the Sky DSP arch, then stamp sentiment in Basic Gray at the top.
- Rip two pieces of Pecan Pie card stock and layer on bottom of tree/sky arch.
- Stamp camper van onto Vanilla card stock using Pecan Pie ink, then color with Stampin’ Blends and die cut. Optional: Die cut a Basic Gray door for the camper, or add sequins to the tires. Attach camper to tree/sky arch with dimensionals.
- Accordion fold all the score lines, so each side of the card has a gusset going to the inside of the frame.
- Adhere the arch scene through the front of the frame to the inside back of the card, then attach the 1/2” end of the card inside the front panel using Tear & Tape. Card should smash flat when inserted into an envelope.
- Attach vanilla card stock to back of card for writing.
![Everyday Arches Bundle (English) [ 164630 ]](https://assets1.tamsnetwork.com/images/EC042017NF/164630s.jpg "Everyday Arches Bundle (English) [ 164630 ]")
![Adventure Together Bundle (English) [ 164850 ]](https://assets1.tamsnetwork.com/images/EC042017NF/164850s.jpg "Adventure Together Bundle (English) [ 164850 ]")
![Everyday Skies 6" X 6" (15.2 X 15.2 Cm) Designer Series Paper [ 164622 ]](https://assets1.tamsnetwork.com/images/EC042017NF/164622s.jpg "Everyday Skies 6\" X 6\" (15.2 X 15.2 Cm) Designer Series Paper [ 164622 ]")
![Old Olive 8-1/2" X 11" Cardstock [ 100702 ]](https://assets1.tamsnetwork.com/images/EC042017NF/100702s.jpg "Old Olive 8-1/2\" X 11\" Cardstock [ 100702 ]")
![Pecan Pie 8 1/2" X 11" Cardstock [ 161717 ]](https://assets1.tamsnetwork.com/images/EC042017NF/161717s.jpg "Pecan Pie 8 1/2\" X 11\" Cardstock [ 161717 ]")
![Very Vanilla 8 1/2" X 11" Cardstock [ 166784 ]](https://assets1.tamsnetwork.com/images/EC042017NF/166784s.jpg "Very Vanilla 8 1/2\" X 11\" Cardstock [ 166784 ]")
![Old Olive Classic Stampin' Pad [ 147090 ]](https://assets1.tamsnetwork.com/images/EC042017NF/147090s.jpg "Old Olive Classic Stampin' Pad [ 147090 ]")
![Pecan Pie Classic Stampin' Pad [ 161665 ]](https://assets1.tamsnetwork.com/images/EC042017NF/161665s.jpg "Pecan Pie Classic Stampin' Pad [ 161665 ]")
![Basic Gray Classic Stampin' Pad [ 149165 ]](https://assets1.tamsnetwork.com/images/EC042017NF/149165s.jpg "Basic Gray Classic Stampin' Pad [ 149165 ]")
![Peach Pie Stampin’ Blends Combo Pack [ 163827 ]](https://assets1.tamsnetwork.com/images/EC042017NF/163827s.jpg "Peach Pie Stampin’ Blends Combo Pack [ 163827 ]")
![Misty Moonlight Stampin' Blends Combo Pack [ 153108 ]](https://assets1.tamsnetwork.com/images/EC042017NF/153108s.jpg "Misty Moonlight Stampin' Blends Combo Pack [ 153108 ]")
![Old Olive Stampin' Blends Combo Pack [ 154892 ]](https://assets1.tamsnetwork.com/images/EC042017NF/154892s.jpg "Old Olive Stampin' Blends Combo Pack [ 154892 ]")
![Stampin' Dimensionals [ 104430 ]](https://assets1.tamsnetwork.com/images/EC042017NF/104430s.jpg "Stampin' Dimensionals [ 104430 ]")
![Stampin' Cut & Emboss Machine [ 149653 ]](https://assets1.tamsnetwork.com/images/EC042017NF/149653s.jpg "Stampin' Cut & Emboss Machine [ 149653 ]")
![Multipurpose Liquid Glue [ 110755 ]](https://assets1.tamsnetwork.com/images/EC042017NF/110755s.jpg "Multipurpose Liquid Glue [ 110755 ]")
![Tear & Tape Adhesive [ 154031 ]](https://assets1.tamsnetwork.com/images/EC042017NF/154031s.jpg "Tear & Tape Adhesive [ 154031 ]")
Want more inspiration like this?
Be sure to subscribe to my newsletter – my subscribers receive exclusive tutorials and updates that I don’t always share here on the blog. Plus, all my Stampin’ Up! news and updates go straight to your inbox – so don’t miss out!

Check out my online store and see what’s retiring!
P.S. Have you seen my Creative Watercolour Pencil Workshop?
It’s packed with fun techniques, tips, and step-by-step instruction you’ll love!
👉 Check it out here.
Or browse all my current online classes here.
I hope you’re having a FABULOUS day!
Take care & HAPPY STAMPING!


Leave a Reply