Supplies:
-
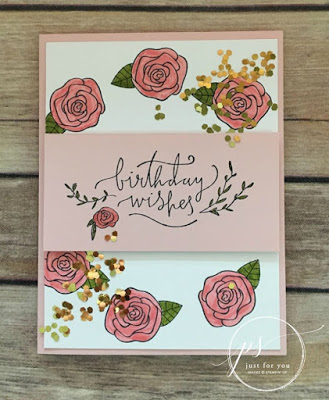
Stamp
Set–
Happiest
of Days
(143796-
clear, 143793- wood) -
Card
Stock –
Powder Pink (144244); Whisper White (100730) -
Stamp
Pads
– Memento Black (132708) -
Misc.
– Flirty Flamingo 2016-2018 In Color Stampin’ Write Markers
(141393); Old Olive Brights Collection Stampin’ Write Markers
(131259); Gold Glitter Flakes (146816); Snail Adhesive (104332);
Stampin’ Dimensionals (104430); Multipurpose Liquid Glue (110755)
Measurements:
-
Powder
Pink Card Stock- 5 ½” x 8 ½” , folded in half, and a separate
4” x 2” piece -
Whisper
White Card Stock- 5 ¼” x 4”
Instructions:
-
Before
you stamp find a circle that is approx. 2 ¾” in diameter. You can
use a cup, a small bowl, a bolt of ribbon, or the little containers
that Stampin’ Up accessories come in. I used my Layering Circles
Framelits Dies for this. Place your “circle” item in the center
of the Whisper White card stock. If your item is big and, in the
way, then lightly trace a circle and put your item aside. Stamp the
flower image using black ink randomly around the “circle”. Now
remove your circle item or erase your pencil marks. -
Color
the flowers using Flirty Flamingo and Old Olive markers. Then,
adhere the Whisper White card stock to the Powder Pink card front. -
Put
tiny dots of Multipurpose Liquid Glue on the bottom left and the
upper right of the stamped flowers- just a few, you could always add
more. Then sprinkle on your Gold Glitter Flakes. Lift card and tap
off excess glitter. You can take a scrap piece of paper and lay it
over your card front to press the glitter down. Glitter is very
clingy and will collect in clumps. Play with your card and pluck off
excess glitter to get it to look the way you want. -
Stamp
the sentiment on the 4” x 2” Powder Pink card stock and color
the leaves and flower with your markers. Then adhere to the middle
front of the card with Stampin’ Dimensionals.

“Customer Appreciation Tutorials”
Every
month my friend Frenchie (France Martin) and I create a special
tutorial with six projects exclusively for our customers! Our
“Passport Pals” tutorials includes
measurements, colour photos, step-by-step instructions (sometimes
videos) and of course, the supplies list! This is our way of thanking
YOU, our valued customer, for shopping with us!
- Every customer who places an order through my online store will receive 12 beautiful project sheets by email.
- When your order is a min. $60CDN
you’ll also receive the exclusive BONUS “Passport Pals” tutorial!

If you live in Canada,
use this special host code before your submit your order:
use this special host code before your submit your order:
Simply enter this month’s special host code prior to submitting
your order through my website. If your order is $200 or more DO NOT
enter the Host Code so that you will also receive your stamping rewards (I will still send you the PDF tutorials).
your order through my website. If your order is $200 or more DO NOT
enter the Host Code so that you will also receive your stamping rewards (I will still send you the PDF tutorials).
If you live in the USA,
click here to visit Frenchie on her to blog and
here to shop through her online store.
This month’s Passport Pals tutorials features:
Petal Palette Bundle
Picture Perfect Stamp Set
Charming Cafe Bundle
Bird Banter Stamp Set
Yay You Host Reward Stamp Set
Video: Embossing Paste Technique
Enjoy the day and HAPPY STAMPING!

Leave a Reply