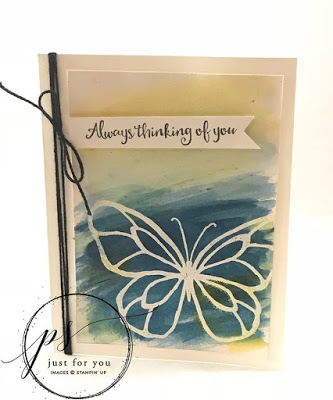
Supplies:
-
Stamp
Sets
– Beautiful
Day W(145912), C (145915) -
Cardstock
–Whisper
White (100730), Shimmer White (101910) -
Stamp
Pads –
Memento Pad (132708), VersaMark Pad (102283) -
Misc.
–Brusho (144101), Aqua Painters (103954), Black Twine (141682),
Stampin Dimensionals (104430), Heat Tool (129053), White Embossing
Powder (109132), Embossing BuddY (103083), Snail Adhesive (104332),
Paper Snips (103579)
Measurements:
-
Whisper
White cardstock – 5-1/2” x 8-1/2”, 3/4” x 4” -
Shimmer
White cardstock – 3-3/4” x 5”
Instructions:
-
Brush
off top of Shimmer White cardstock with the Embossing Buddy. -
Stamp
the Butterfly using the VersaMark pad. -
Sprinkle
stamped butterfly with White embossing powder and heat using the
Heat Tool. -
Using
the Aqua Painter brush water over top of Shimmer White cardstock. -
Sprinkle
Blue Brusho crystals very lightly. Brush lightly with the Aqua
Painter (adding water only if necessary) to create the desired
brushed effect. -
Sprinkle
Yellow Brusho crystals towards the top of the butterfly and randomly
over the blue. Brush with Aqua Painter (adding water if necessary)
to create the desired brushed effect. Let dry completely. -
Stamp
the sentiment on the Whisper White strip. Cut the end using Paper
Snips. -
Adhere
dryed Shimmer cardstock to the Whisper White card using Stampin
Dimensionals. -
Adhere
the sentiment using Stampin Dimensionals. -
Wrap the
Black twine around 3 times and tie into bow near sentiment.
May 2018 Customer Appreciation Tutorials

I sincerely appreciate every order I receive and as a token of my gratitude I want to give YOU something too!
Each month I combine 12 beautiful projects, with measurements, supply
list and step by step instructions, into a special PDF tutorial. When
you place your order through my online store I will email this exclusive
tutorial to you! Just be sure to use the special host code prior to
submitting your order:

Click here to place your order!
If your order is $200 or more DO NOT
enter the Host Code
so that you will also receive your stamping rewards
(I will still send you the PDF tutorials).
enter the Host Code
so that you will also receive your stamping rewards
(I will still send you the PDF tutorials).

Minimum
orders of $60 or more (prior to tax and shipping) will also receive the
Bonus Passport Pals tutorials, created by Frenchie (France Martin) and
myself – that means you’ll receive 18 free project sheets!
orders of $60 or more (prior to tax and shipping) will also receive the
Bonus Passport Pals tutorials, created by Frenchie (France Martin) and
myself – that means you’ll receive 18 free project sheets!
This month’s Passport Pals tutorials are masculine themed cards!
If you live in the USA, click here to visit Frenchie on her to blog and here to shop through her online store.
Thanks for stopping by ~ I hope you were inspired by today’s project and that you’ll visit again soon!
Enjoy the day & HAPPY STAMPING!

Hi Tina 🙂
Truly beautiful cards, always! Love looking at them for inspiration.
I am from NB. I found you and your blog through a fellow Stampin' Up demonstrator (really happy about that) and what I love most about Stampin' Up is how you can really use very few stamps to get a large variety of cards and themes. Awesome!
Keep up the great work!
Jenn