Supplies:
-
Stamp
Sets – Signs
of Santa Bundle
(149967); Buffalo Check (w:
147797, c: 147794) -
Card
Stock – Shaded Spruce
(146981); Whisper White (100730) -
Stamp
Pads – Real Red Classic
Stampin’ Pad (147084); Memento Ink Pad (132708) -
Stampin’
Blends – Real Red Combo Pack
(147935); Shaded Spruce Dark (147937); Daffodil Delight Dark
(144585); Smoky Slate Light (145054); Ivory (144606); Color Lifter
(144608) -
Misc.
– Santa’s Workshop Specialty Designer Series Paper (DSP)
(147809); Layering Circles Framelits (141705); Poppy Parade ½”
Textured Weave Ribbon (147813); Stampin’ Dimensionals (104430)
Measurements:
-
Shaded
Spruce: 8-1/2” x 5-1/2”; 3-12” x 3-1/2” -
Whisper
White: 5-1/4” x 4” (2); 3-12” x 3-1/2”
Instructions:
-
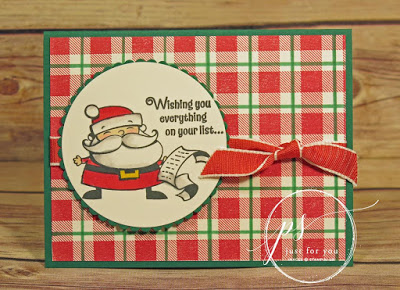
Fold
card base in half and set aside. -
Stamp
Buffalo Check image with Real Red ink on Whisper White cardstock. -
Using a
ruler and dark Shaded Spruce Stampin’ Blend, draw lines as shown
in the photo. -
Wrap
ribbon around stamped image and tie in a knot; adhere to card base. -
Die cut
with largest circle die. Use largest scalloped circle die to cut
from Shaded Spruce cardstock. Adhere circles together and attach to
card with Stampin’ Dimensionals. -
For
inside, stamp “…and more!” o Whisper White cardstock. Die cut
a Mrs. Claus from DSP and adhere (or stamp and color as for Santa).
Adhere to inside.


Get up to $60 FREE Stampin’ Up! product of your choice and 160 project tutorials!
Click here for all the details!
 |

I sincerely appreciate every order I receive and as a token of my gratitude I want to give YOU something too! Each month I combine 12 beautiful projects, with measurements, supply list and step by step instructions, into a special PDF tutorial. When you place your order through my online store I will email this exclusive tutorial to you! Just be sure to use the special host code prior to submitting your order:


If your order is $200 or more DO NOT
enter the Host Code
so that you will also receive your stamping rewards
(I will still send you the PDF tutorials).
enter the Host Code
so that you will also receive your stamping rewards
(I will still send you the PDF tutorials).
Thanks for stopping by ~ I hope you were inspired by today’s project and that you’ll visit again soon!
If you live locally I’d love for you to join in on my classes & events.
Click here to see what’s coming up!
Enjoy the day & HAPPY STAMPING!

Leave a Reply