Hi friends!
Well… the countdown is officially ON. Only six more days until Christmas.
How. In. The. World.
I swear I don’t know where the time goes (and yes, I do know it goes even faster as we get older) — holy carumba. It honestly feels like I was just planting veggie seeds in the garden, and here we are… almost at the end of December.
The flip side of that, of course, is that all this cold, snowy, stormy weather will eventually give way to warm days again. And funny enough, today decided to mess with us a bit — it hit plus 12 degrees, which is absolutely bonkers for this time of year. But don’t let that fool you. When you combine today’s warmth with the minus temperatures (aka ‘normal winter weather‘) coming back tonight, it means one thing… a whopper of a storm is rolling in. Rain, wild winds, and gusts predicted anywhere from 100–140 km/h. Yeesh.
Having grown up on Vancouver Island, strong winds aren’t new to me. But when they get this intense here on the East Coast, it’s a whole different story — and sometimes that means real damage. So we’re battening down the hatches, staying warm and cosy, and I’ve been hustling today to get all my computer work done before things get crazy outside.
My plan? Snuggle up under a blanket with a good book, a glass of wine, and actually relax, knowing I got my work done first.
What isn’t done though… my Christmas cards. gulp.
I’ve mailed out quite a few already, but I still have a pile of addressed envelopes patiently waiting for cards. I had every intention of having them all stamped and ready to go by now, but… life happens. And sometimes our days don’t go exactly as planned.
Honestly, I’ve never minded receiving Christmas cards after Christmas anyway — they almost feel like bonus holiday mail. And really, our handmade cards are just hugs in the mail any time of year, so I’m sure my loved ones whose cards arrive a bit late will understand.
And that brings me to today’s cards...

Since I still have a stack of Christmas cards to finish, I decided to keep things simple and reach for one of my favourite go-to layouts — the kind of design that’s easy to make, easy to change up, and doesn’t feel boring even when you use it more than once.
I used this same layout to create three different cards, all with the exact same measurements and structure, just styled with different stamps, colours, and textures. It’s one of those designs that works beautifully whether you’re short on time, batch-making cards, or just want something you know will turn out well every single time.
So before we get into each card, let me share the basic layout and measurements I used for all of them.
The Base Layout & Measurements
All three cards start with the same simple foundation — and once you’ve made one, the rest come together very quickly.
- Card base:
8½” × 5½”, folded at 4¼”
Finished card size: 5½” × 4¼”
From there, I added a few easy layers and a horizontal centre strip that grounds the whole design. It’s a layout that looks polished without being fussy — always a win in my books.
A quick note: All of the stamp sets/embossing folders used on today’s cards are retired Stampin’ Up! products. I love pulling out my retired stamps and showing how timeless they really are — because great designs and layouts work beautifully no matter what stamps you use.
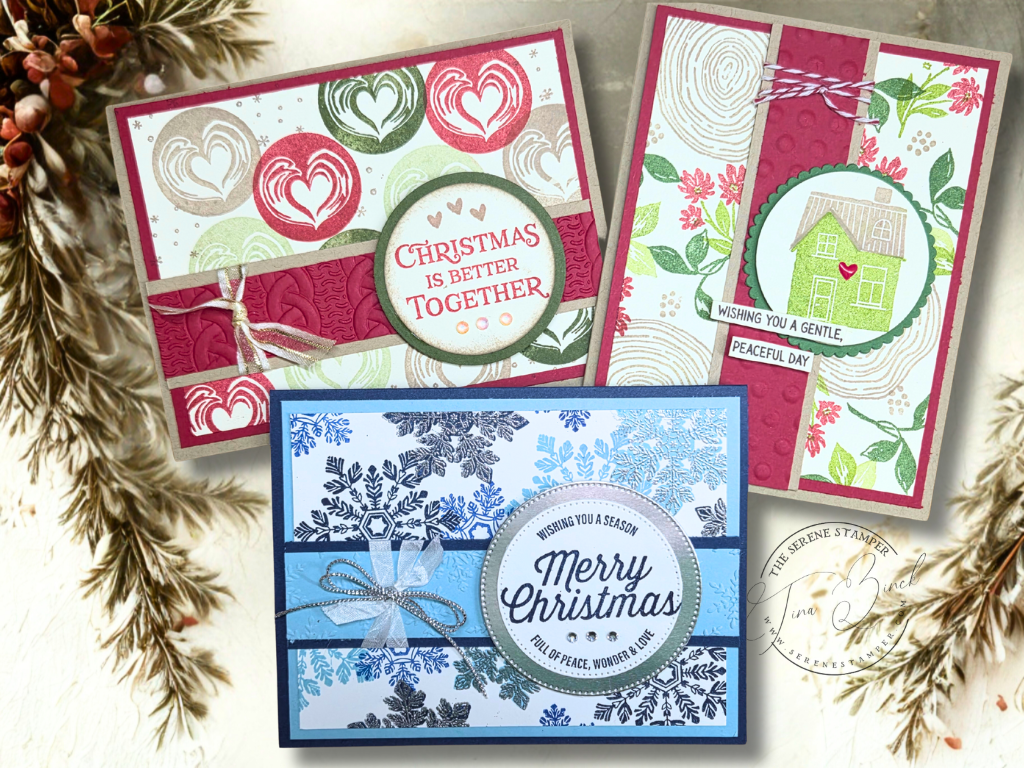
Card 1 – Christmas Is Better Together

This first card has all the warm, cozy Christmas feels — classic colours, soft texture, and a sentiment that just makes you smile. Personally, I think using the heart image from the “Latte Love” set to make a Christmas card is pretty clever…just sayin’. I’m always looking at different ways to use my stamps! The sentiment I used is from the “Reindeer Fun” stamp set.
Cardstock & Layers
- Card base: Crumb Cake
- Mat layer: Real Red – 5¼” × 4″
- Main panel: Very Vanilla – 5″ × 3¾”
Background Stamping
On the Very Vanilla panel, I stamped hearts using:
- Real Red
- Crumb Cake
- Soft Sea Foam
- Mossy Meadow
The heart images are from the Latte Love Stamp Set, and I added a few subtle snowflakes stamped in Crumb Cake ink using the Our House to Yours Stamp Set.
Centre Strip
This strip really anchors the design:
- Crumb Cake strip: 5¼” × 1¼”
- Real Red strip: 1″ × 5¼”
I ran the Real Red strip through the Knit Embossing Folder, wrapped a piece of ribbon around it, tied it in a knot, and then adhered the whole piece to the card front.
Sentiment Focal Point
- Circles die-cut from Mossy Meadow and Very Vanilla
- Sentiment stamped in Real Red ink from the Reindeer Fun Stamp Set
- Light sponging around the edge with Crumb Cake ink
- A few extra stamped hearts for detail
- Mounted with foam adhesive
- Finished with three embellishments
Inside the Card
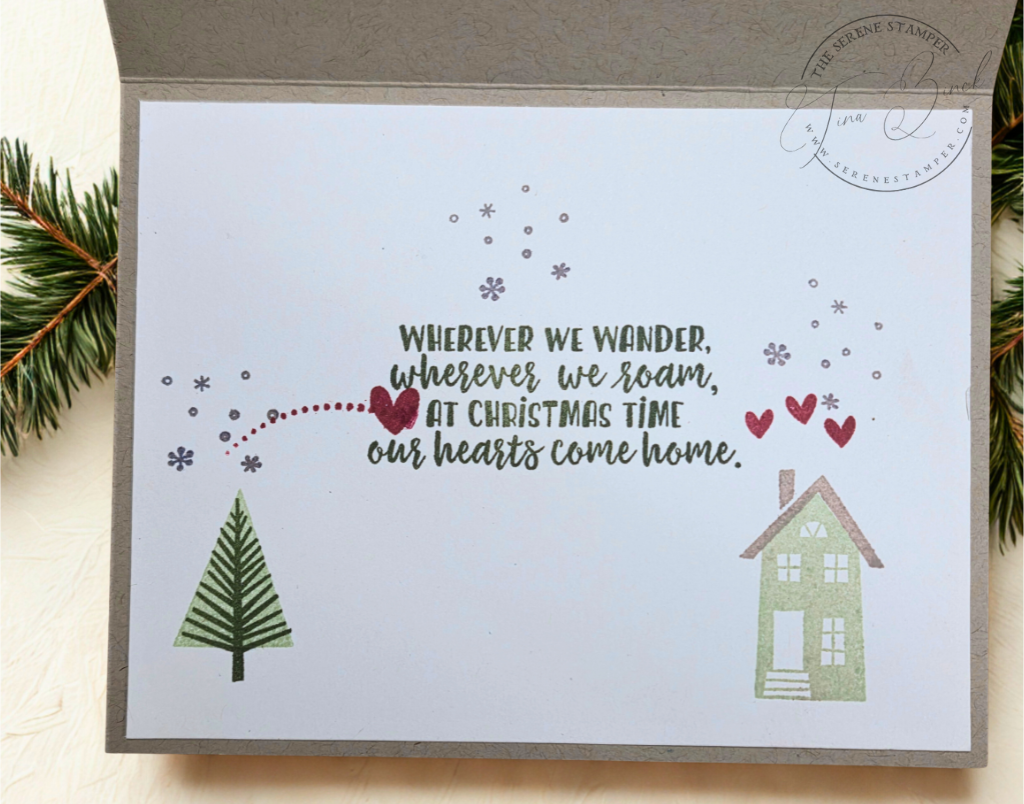
I kept the inside simple, stamping images from the Our House to Yours Stamp Set and leaving plenty of room for a handwritten message. And just between us… a teeny drop of water from my glass splashed onto one of the hearts and smudged it slightly — but I think it still works (whew).
Card 2 – Wishing You a Gentle, Peaceful Day
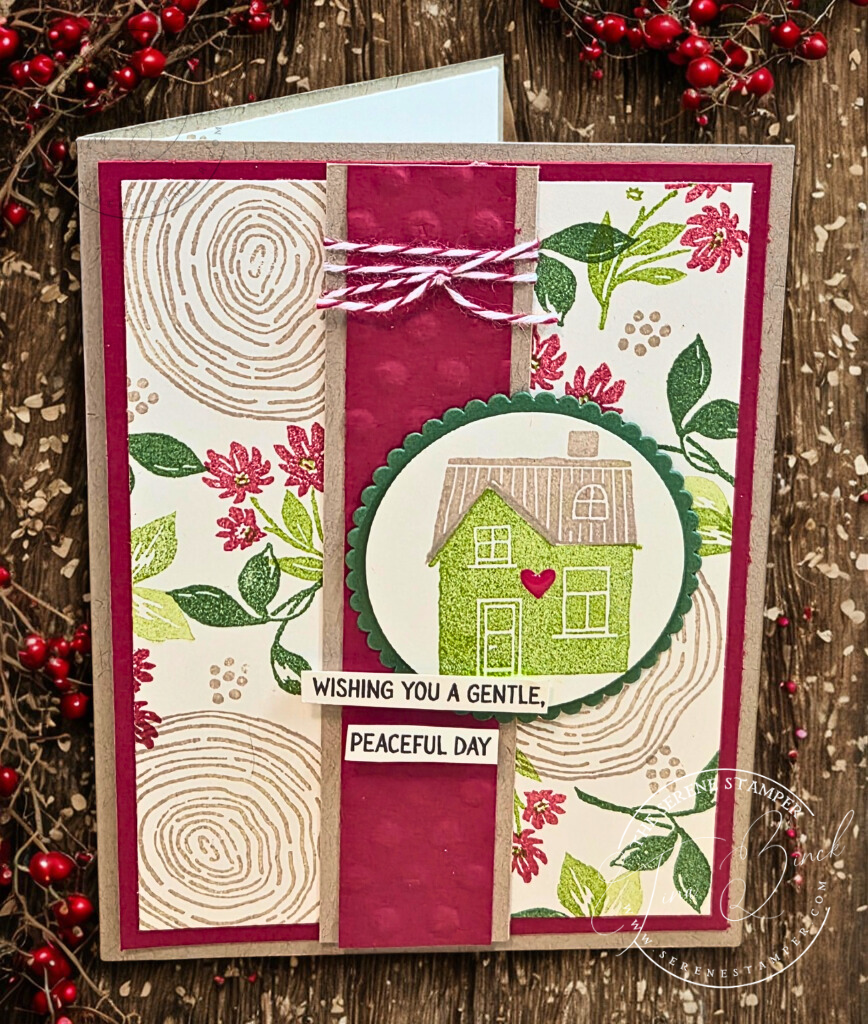
This second card uses the exact same layout, but with a softer, more everyday feel — perfect for winter thank you cards or thinking-of-you cards. I also changed the ribbon for a slightly different look, and the sentiments used here are ones I created myself and included inside my new Card Maker’s Idea & Inspiration Guide (coming soon!).
What Changed
- All stamping is from the Our House to Yours Stamp Set
- I used a Polka Dot Embossing Folder instead of the knit texture
- The sentiment was cut using a scalloped circle die
- Cardstock swap:
- Garden Green for the scalloped circle
- Still using Real Red and Crumb Cake as coordinating colours
- I changed the ribbon for a slightly different look
- The sentiments are ones I created myself
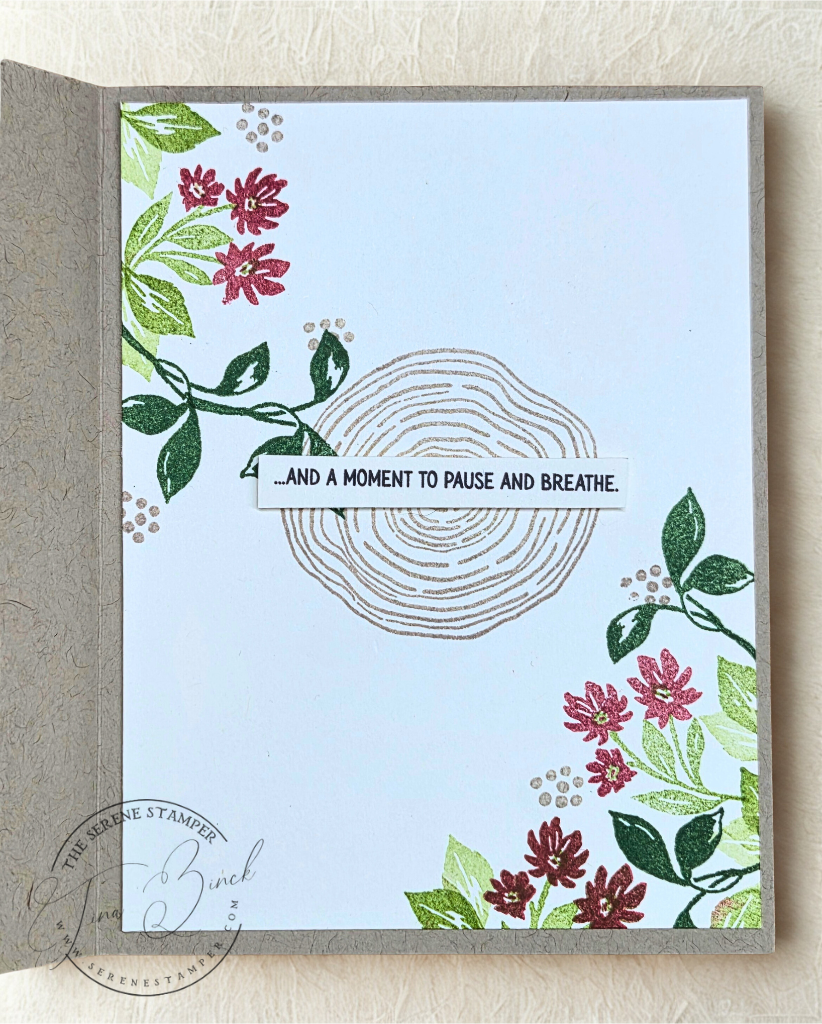
Everything else — measurements, layering, and construction — stayed exactly the same. Here’s the inside of the card:
Card 3 – Sparkling Snowflake Christmas Card
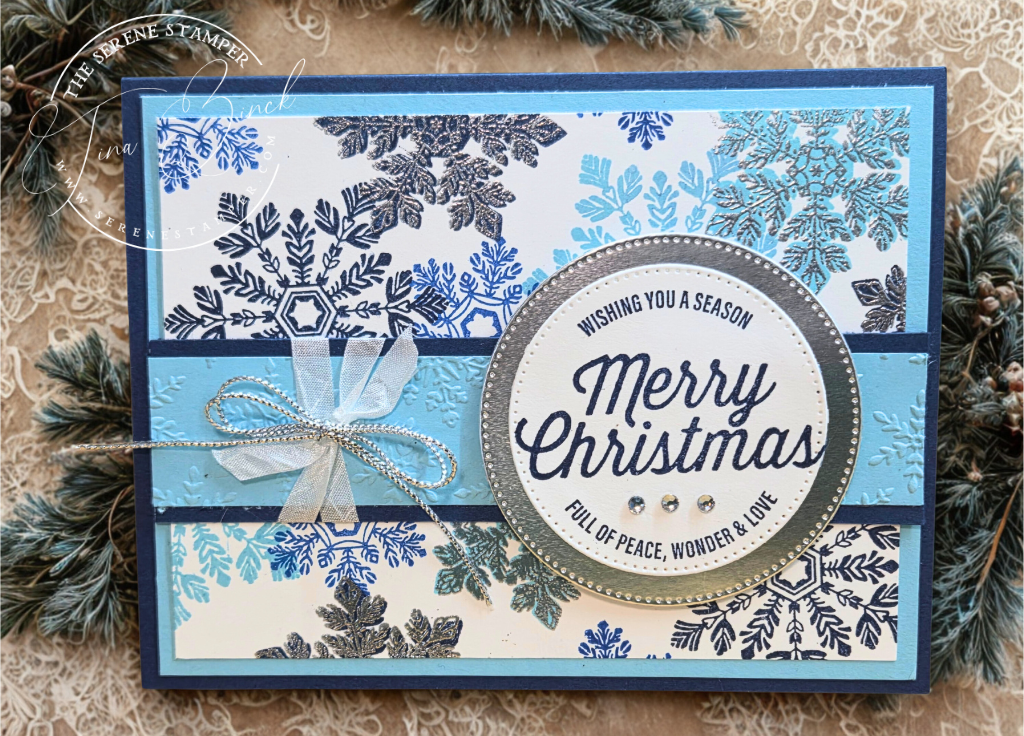
For the third card, I kept the layout identical once again but switched to cool winter tones and added a little sparkle — because it is Christmas, after all. The sentiment is from “Farmhouse Christmas” – which happens to be one of my all time FAVOURITE Christmas sets.
Isn’t it surprising how different this card looks compared to the first two? Stamps are just so MAGICAL. Even if I had made this card using the same red, green, and Crumb Cake colour combo as the first two, it would still be beautiful. And if you swapped the silver circle and twine for gold… wowsa! It would instantly feel rich, warm, and elegant.
Cardstock & Colours
- Card base: Night of Navy
- Accent layers: Balmy Blue
- Main panel: Basic White
Ink colours used:
- Blueberry Bushel
- Night of Navy
- Balmy Blue
Background & Texture
I stamped snowflakes in all three ink colours, then added a few extra snowflakes stamped in VersaMark and heat-embossed with silver embossing powder.
The background texture was added using the Snowflake Embossing Folder, which gives lots of interest without overwhelming the design.
Centre Strip & Focal Point
- Same horizontal centre strip placement as the first two cards
- Larger circle die-cut from Silver Cardstock
- Sentiment stamped in Night of Navy ink
- Layered and popped up with foam adhesive
Inside the Card

I repeated the snowflake images on the inside and kept it clean and simple, with plenty of space to write.
One Layout, So Many Possibilities
This is exactly why I love layouts like this one.
With just a few simple changes — colour, stamps, embossing folders — you can turn one sketch into:
- A cozy Christmas card
- A soft, everyday card
- A crisp, elegant winter card
It’s reliable, flexible, and perfect when time is short but you still want something beautiful.
This layout is also featured inside my Card Maker’s Idea & Inspiration Guide (coming soon), and it’s one I use over and over again.
Thanks so much for stopping by today. I hope these cards inspire you to pull out your supplies, pour yourself something warm (or maybe a glass of wine 😉), and enjoy a little creative time — even in the busiest season of the year.
I’ll have another video up for you before Christmas. In the meantime, take care and HAPPY STAMPING!

These give such cozy vibes, Tina! I absolutely love your work and have been a long-time fan in the US. Your joy of stamping is infectious and you are gifted in showing techniques and in encouraging people that they can do it, too. Lots of love to you in 2026!
Awww, thanks Nicole. That means a lot to me! Love back to you and may 2026 bring you all that you’re wishing for! xoxo