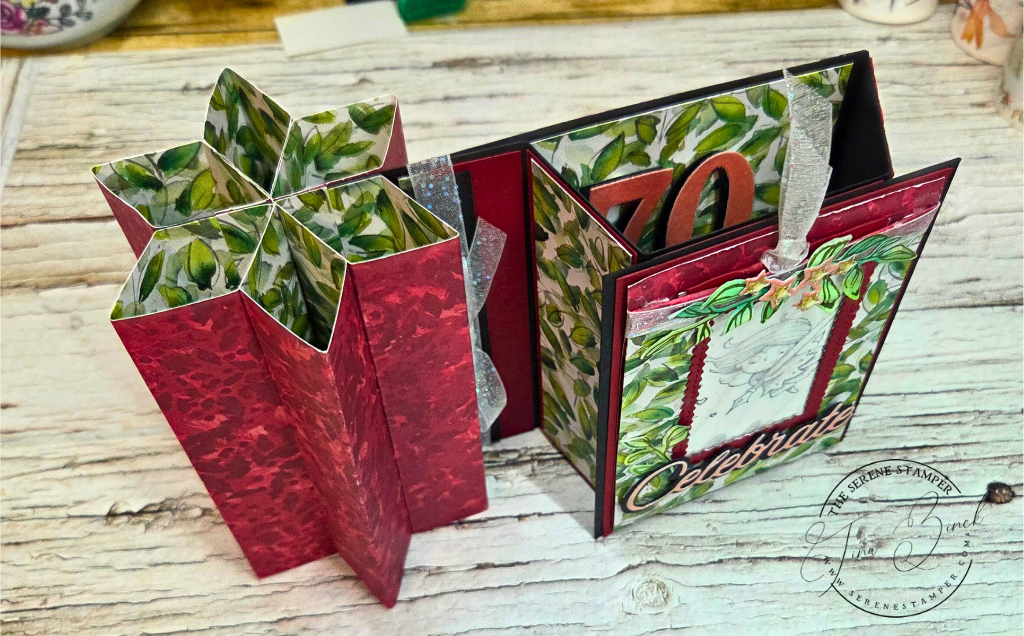
Hi Friends! Today I’m sharing a really special project with you — my Triple WOW Card that I designed for my aunt’s 70th birthday. This card brings together three favourite interactive folds — the Star Fold, the Bay Window Fold, and the Magic Slider — all in one show-stopping design. This Triple WOW concept is my own unique creation, and I’m so excited to share it with you!.
It’s one of those cards that looks complicated at first glance, but once you break it down into sections, I promise it comes together easily. And ohhhhh my goodness… lemme just say, it’s mighty impressive when it’s finished! So, if you’re looking for a birthday, milestone, or celebration card that truly has that “wow” factor, THIS is the card you want to make!!!


I’ve included photos, measurements, and notes to help you recreate the same style or adjust it for your own occasion.
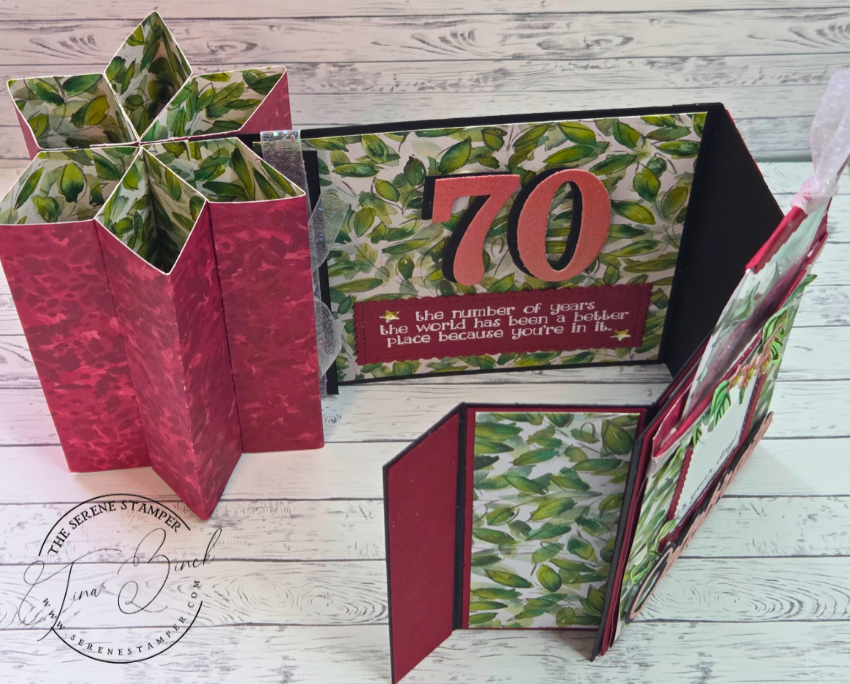
The Star Fold
This is the awesome standing star feature that forms the left side of the card. It folds flat for posting, then pops right back up into a beautiful 3D star when opened. To see how to make this card (with my video) click HERE.
The only difference with this WOW version is that I used a 5″ x 7″ card base instead of the 5″ x 6″ size I recently shared — I needed to add that extra inch to make room for the bay window section.
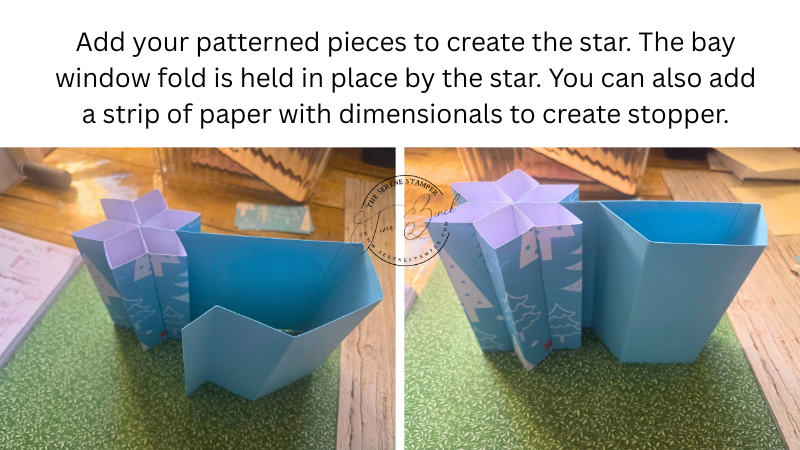
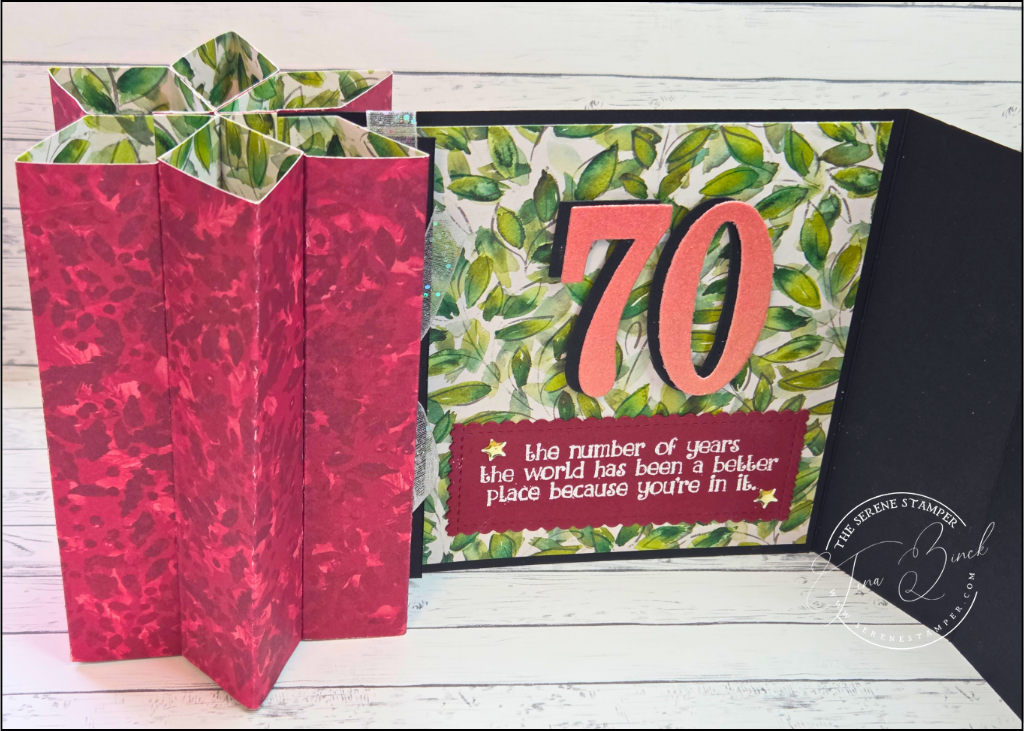
The Bay Window Fold
This middle section adds depth and dimension. It opens like a little window display and is wonderful for sentiments or decorative elements.
The Magic Slider
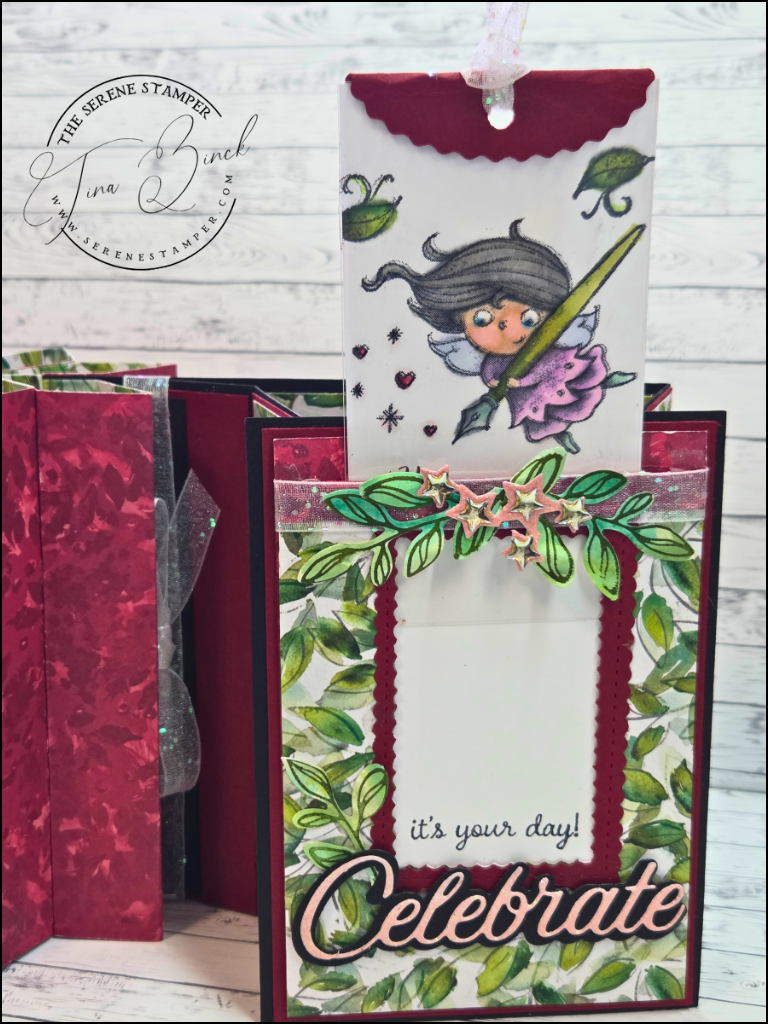
The front panel features a pull-out slider with a stamped and coloured fairy image behind a clear window. When the tab is pulled, the hidden message pops up — it’s such a charming detail and perfect for birthdays.
Here’s today’s video for you!
I sped up a few parts to keep things moving, but you’ll still see every step from start to finish:
If you’d like to see this Triple WOW Card in “real time” with a slower, step-by-step tutorial, I’ve got another video coming soon where I walk you through all the measurements and folds. I’ll also be sharing a few fun variations of the Triple WOW design! If you’re subscribed to my YouTube channel, you’ll see it pop up there. (Because of course, I just HAD to make MORE of these Triple WOW Cards!).
✨ Measurements I Used
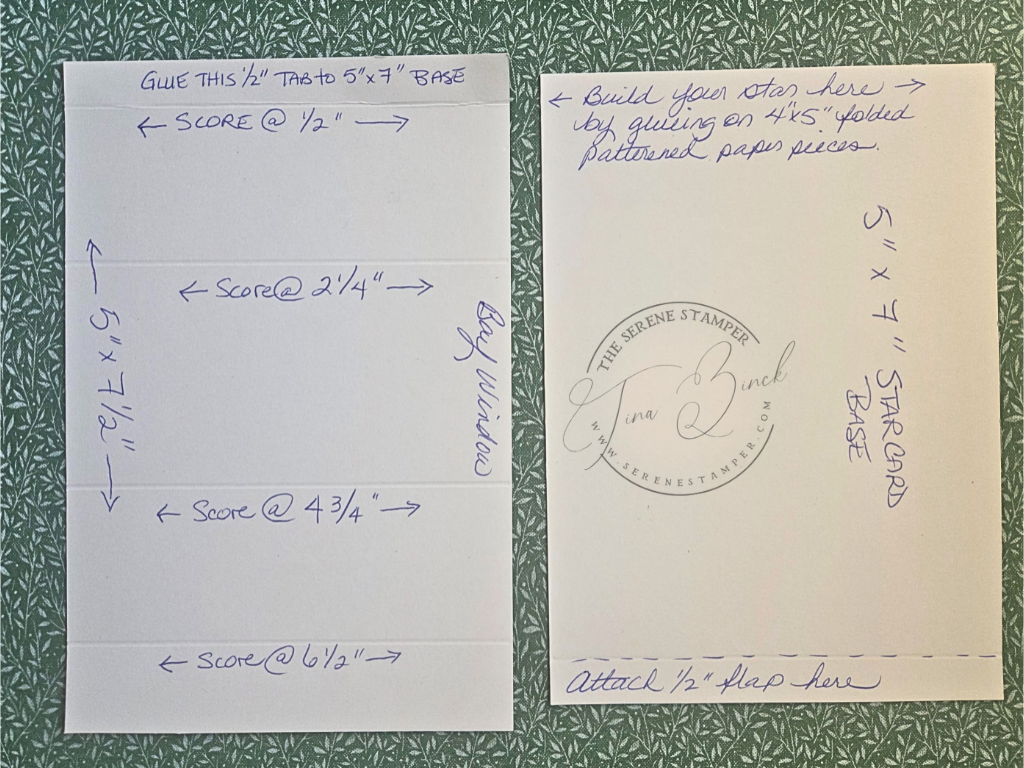
Here are the notes and measurements for my aunt’s birthday card. These are handwritten in the photos below, but I’ve typed them out for convenience:
Here’s my original post with the Bay Window tutorial for a 5 1/2″ x 4 1/4″ card: click HERE

Triple WOW Card – Measurements (Star Fold + Bay Window)
Star Card Base
Basic Black Cardstock
• Cut 5 x 7 inches
Bay Window Piece
Basic Black Cardstock
• Cut 5″ x 7½”
• Score along the 7½” side at:
– ½”
– 2¼”
– 4¾”
– 6½”
• Fold on all score lines.
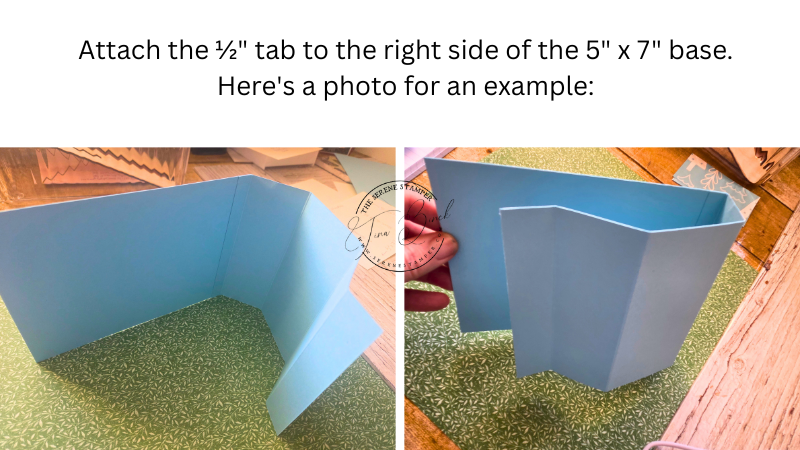
• Add adhesive to the ½-inch flap and attach to the 5 x 7 base.
Bay Window Layers
Real Red Cardstock
• Side Panels (2): 4⅞ x 1⅝ inches
• Front Panel (1): 4⅞ x 2⅜ inches
• Stopper Base (1): 4⅞ x ⅞ inch
Designer Series Paper (Layers for the red pieces)
• Side Panel Layers (2): 4¾ x 1½ inches
• Front Panel Layer (1): 4¾ x 2¼ inches
• Optional Stopper Layer (Basic Black card stock) (1): 4¾ x ⅝ inch
– Adhere the 4¾ x ⅝ inch cardstock onto the 4⅞ x ⅞ inch piece to create your stopper. I added a long strip of foam adhesive behind it and attached it flush against the star fold so the bay window flap can tuck neatly behind. This step is optional — the flap will stay in place on its own because of the star — but if you want it to lock in securely, the stopper works beautifully.
Inside & Back Panels
Designer Series Paper (optional for the back)
• Inside Centre Panel: 4¾ x 4¾ inches
• Back Panel (optional): 4¾ x 4¾ inches
Decorate each panel with patterned paper or as desired to coordinate with the rest of your project.
Magic Window Slider – Measurements & Prep


Here’s my original Magic Window Slider Card blog post and video:
Slider Base
Real Red Cardstock
• Cut 9½ x 3¼ inches
• Score at 4¾ inches and fold in half
• Along the folded crease, use a punch or trimmer to create a slit/window —
leave a small margin on each end so the slider stays intact.
Slider Pieces
Basic White Cardstock
• Cut 4 x 2¼ inches
Clear Window Sheet
• Cut 4 x 2¼ inches
Place your Basic White cardstock onto your stamp positioning tool and stamp your image, then colour it as desired. Lay the window sheet directly over top, remove the white piece, and stamp the same image onto the window sheet using StazOn so it won’t smudge. Stack the two stamped pieces together so the images line up perfectly.
Use Mini Glue Dots along the top edge to attach the stamped Basic White piece to the window sheet. Then cut a small shape and fold it in half to create a little topper that hides the glue dots — I used my scalloped oval punch with a scrap of Real Red cardstock for this..
Slider Pocket Layers
Base Slider Pocket (already created earlier):
• Real Red, 9½ x 3¼ inches, folded at 4¾, slit along fold
Mounting Layers for the Slider Pocket
Layer 1 (behind the slider pocket):
• Cardstock (any colour): 4¾ x 3½ inches
– The back of the slider pocket gets glued onto this
Layer 2:
• Cardstock (different colour): 5 x 3¾ inches
Layer 3:
• Cardstock (another colour): 5 x 4¼ inches
– This entire assembled piece is what gets centred on the Bay Window front
Die-Cut Window Piece
Top Panel (to create the window opening):
• Cardstock: 4¾ x 3½ inches
Patterned Paper (DSP):
• 4½ x 3¼ inches
– This DSP is die-cut with the cardstock panel (not glued), then glued after
Scalloped Frame:
• Cut using a larger scalloped rectangle die
– Fits around the die-cut opening in the 4¾ x 3½ panel
✨ Supplies Used for My Triple WOW Card
Most of the products I used on my aunt’s birthday card are retired from Stampin’ Up!, but here is the full list so you can recreate the look with what you have at home. I can’t recall the name of the retired Designer Series Paper that I used but any patterned paper will work beautifully for this card!
Stamp Sets & Bundles
• New Wonders (retired)
• Happiest of Birthdays (retired)
• Paper Pumpkin watermelon-themed kit — sentiment (retired)
• Layering Leaves Bundle (includes the coordinating punch)
Dies & Punches
• Stitched So Sweetly Dies (retired)
• Wanted to Say Dies
• Leaf Punch from Layering Leaves Bundle
• Oval Punch (retired)
• Crop-A-Dile (for ribbon hole/tab)
Paper & Cardstock
• Cherry Cobbler Cardstock
• Basic Black Cardstock
• Basic White Cardstock
• 12″ x 12″ Glimmer Cardstock (retired)
• Window Sheets (for the Magic Slider)
Tools
• Stamparatus
• Paper Trimmer
• Simply Scored Scoring Tool
• Heat Tool
• Clear Blocks
• Crop-A-Dile
Adhesives
• Tear & Tape
• Stampin’ Dimensionals
• Foam Adhesive Strips
• Mini Glue Dots
• Multipurpose Liquid Glue
Ribbon & Embellishments
• Glittered Organdy Ribbon (retired)
• Crystal Effects
• Small star embellishments
Inks & Colouring
• Black StazOn Ink — Use this on Window Sheets so it dries properly; other inks will smear.
• Memento Black Ink
• Stampin’ Blends Markers (for colouring the fairy image)
Ink Colours for the Leaf Wash
To create the leafy accents, I simply tapped several ink pads onto a clear block, added a bit of water, and brushed a loose wash of colour onto scrap Basic White cardstock.
Colours used:
• Old Olive
• Garden Green
• Mossy Meadow
• Shaded Spruce
• Lemon Lime Twist
Once the wash was dry, I stamped the leaves from Layering Leaves, punched them out, and added them to my card.
I couldn’t resist decorating the envelope for my Aunt’s birthday card — it just made the whole project feel extra special. I coloured the stamped fairy with my watercolour pencils and blended everything softly with a blender pen, then added a coat of Crystal Effects for a glossy, dimensional finish. The gap between the window sheet and coloured image makes it a bit blurry in the photo – it’s not your eyes playing tricks on you…LOL.
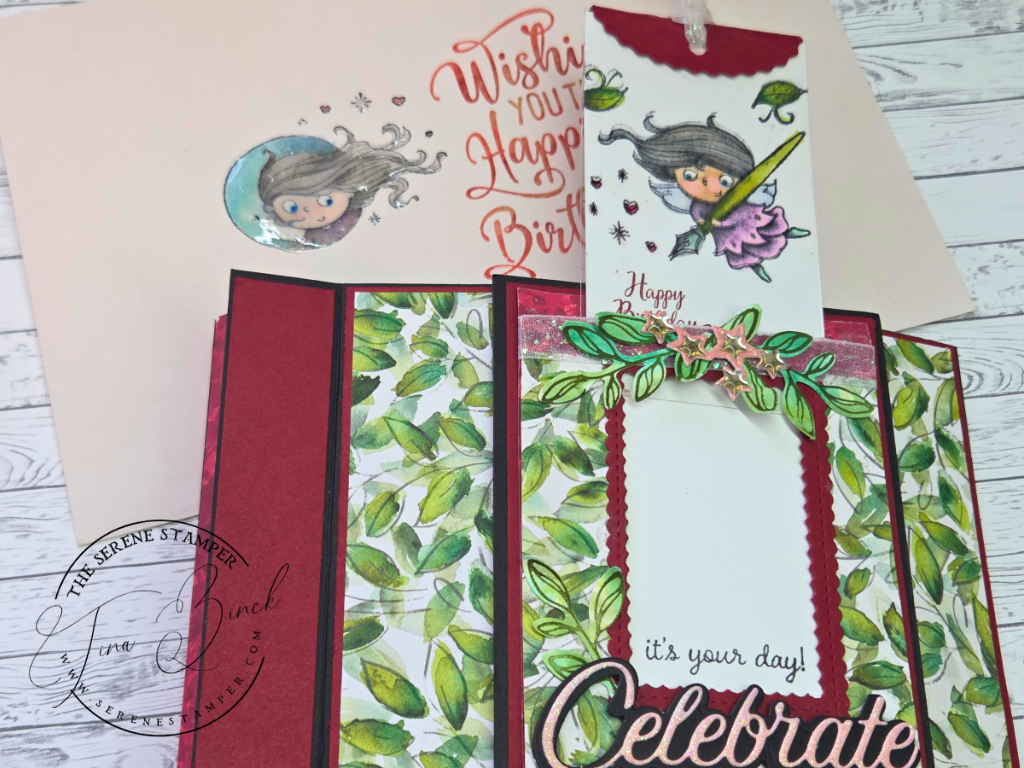
For the sentiment, I used my Stamparatus so I could build up the colour in layers. I stamped first in Petal Pink, then used sponge daubers to add Real Red and Cherry Cobbler directly onto the stamp before pressing it down again. Once I was happy with the blend, I cleaned the stamp, inked it with VersaMark, and stamped one last time so I could heat emboss the sentiment in clear. The result is such a pretty, raised shine — the perfect finishing touch for a special envelope.
This Triple WOW Card was so much FUN to create, and I am pretty sure it will make my aunt’s 70th birthday extra special. I hope it inspires you to give it a try — the combination of these folds really does make for a fabulous project.
If you make one, I’d love to see it!
You can share your photos with me on my Serene Stamper Facebook page or tag me on Instagram.
Have a wonderful day and HAPPY STAMPING!

If you enjoy my tutorials and would love even more creative inspiration, you’re warmly invited to join my Serene Stamper Studio on YouTube. Members receive access to exclusive videos, vault classes from years past, private tutorials, and extra stamping fun you won’t find anywhere else.
It’s a lovely way to support my channel and enjoy a whole bundle of creativity each month.

Wow, Tina! You “knocked it out of the park”! The video was so inspiring, and I’m so excited to try adding the bay window component to my next card. I’ve made seveal of the star cards and I love how they’ve turned out.
Thank you for sharing all the techniques, and beautiful designs. You always inspire me.
Blessings to you and Brian….& Cooper too!
Sue Floyd
Hi Sue,
Thank you so much for your kind words! I’m thrilled you enjoyed the video and that the bay window fold has sparked some new ideas for you. It means the world that you take the time to watch and create along with me.
Blessings to you — and Cooper sends a wag right back!
Big hugs,
Tina xoxo
You are so creative. This is a MASTERPIECE and there should be some kind of paper crafting award you should receive for it. Thank you for sharing it with us.
Oh my goodness Debbie… that was super sweet of you to say.. thank you! I have to admit, I’m a wee bit proud of myself with this card lol. Thanks again for your kind words. Xoxo